| 89.2. TheGreenBow IPsec VPN client | ||
|---|---|---|
 | Chapter 89. IPsec clients |  |
| 89.2. TheGreenBow IPsec VPN client | ||
|---|---|---|
| | Chapter 89. IPsec clients | |
Go to http://www.thegreenbow.com/ and download TheGreenBow IPsec VPN client from Products > VPN Client > Download section.
Double-click the downloaded file and install the program following the instructions.
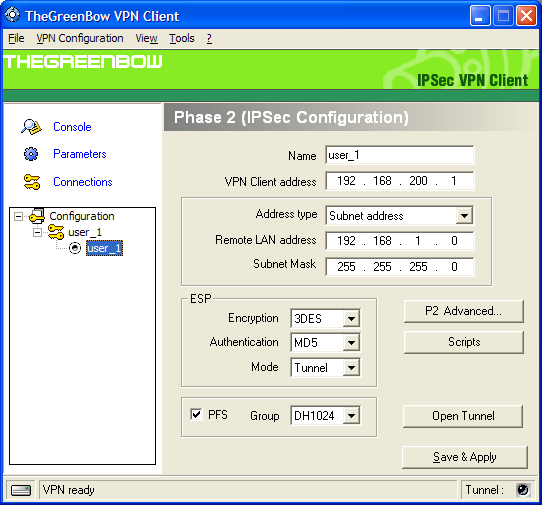
These tables show the parameters of TheGreenBow and their corresponding parameters in Abilis configuration. The information must be inserted in a “mirror” way: i.e. “LOCAL” information for Abilis are “REMOTE” for IPsec client and vice versa.
Table 89.2. Phase 1 parameters
| TheGreenBow parameter | Abilis IKE Table | Abilis IKE Table parameter |
|---|---|---|
| Name | HOST | NAME |
| Interface | HOST | REM-IP |
| Remote Gateway | HOST | LOC-IP |
| Preshared Key | PSK | KEY |
| Encryption | HOST | CIPHER |
| Authentication | HOST | HASH |
| Key Group | HOST | DH |
| Remote ID (Advanced parameter) | HOST | ID-TYPE |
| Remote ID Value (Advanced parameter) | HOST | IP or FQDN |
| Local ID (Advanced parameter) | HOST | PEER-ID-TYPE |
| Local ID Value (Advanced parameter) | HOST | PEER-IP or
PEER-FQDN |
Table 89.3. Phase 2 parameters
| TheGreenbow parameter | Abilis IKE Table | Abilis IKE Table parameter |
|---|---|---|
| Name | CLI | NAME |
| VPN Client address | CLI | NET-REM |
| Address type | CLI | |
| Remote host address | CLI | NET-LOC |
| Subnet Mask | CLI | NET-LOC |
| Encryption | CLI | ESP-CIPHER |
| Authentication | CLI | ESP-AUTH |
| Mode | CLI | TUNNEL |
Suppose that Abilis is configured in the following way. Refer to Section 81.19.1, “How to configure a RAS using IPSEC VPN server” for the configuration of IPsec and IKE resources.
[22:54:53] ABILIS_CPX:d ike host:0------------------------------------------------------------------------------- HOST: NAME: LIFETIME: HASH: DPD: DPD-ACTION: LOCIP: NATT: MODE: MODE-CFG: DH: DPD-DELAY: REMIP: SIDE: AUTH: XAUTH: CIPHER: SA-TRY: DPD-TOUT: XAUTH-USER: XAUTH-PWD: -- PSK ID --------------------------------------------------------------- ID-TYPE: IP:/ID: PEER-ID-TYPE: PEER-IP:/PEER-ID: -- RSA Cert ------------------------------------------------------------- CERT-SEND: ASN1-DN: CERT-PEER: PEER-ASN1-DN: CERT-VERIFY: ------------------------------------------------------------------------------- 0 Agent_HOST1 28800 MD5 YES STOP 080.080.080.080 SYS MAIN NO MODP1024 30 * INSIDE PSK NO 3DES 3 120 -- PSK ID --------------------------------------------------------------- IP 080.080.080.080 IP 192.168.200.001 ------------------------------------------------------------------------------- [22:54:53] ABILIS_CPX:d ike psk:0------------------------------------------------------------------------------- PSK: KEY: PEER-ID-TYPE: PEER-IP:/PEER-ID: ------------------------------------------------------------------------------- 0 ******** ANONYMOUS [22:54:53] ABILIS_CPX:d ike cli:0------------------------------------------------------------------------------- CLI: NAME: LIFETIME: ESP: AH: HOST: NET-LOC: RULE: PASSIVE: PFS: ESP-AUTH: AH-AUTH: NET-REM: PERMANENT: TUNNEL: ESP-CIPHER: MODE-CFG-DNS: ------------------------------------------------------------------------------- 0 Agent_Cli1 3600 YES NO 0 192.168.001.000/24 IPSEC YES YES MD5 MD5 192.168.200.001/32 YES YES 3DES SYS -------------------------------------------------------------------------------
Execute TheGreenBow program: the following window will appear.
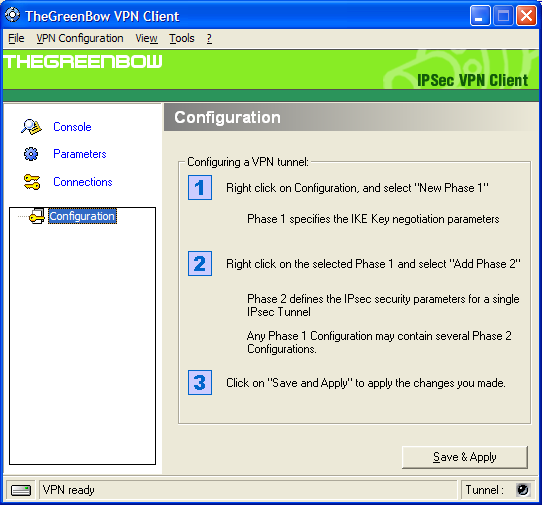
Configuration of Phase 1.
Right click on , and select .
Configure as shown here below.
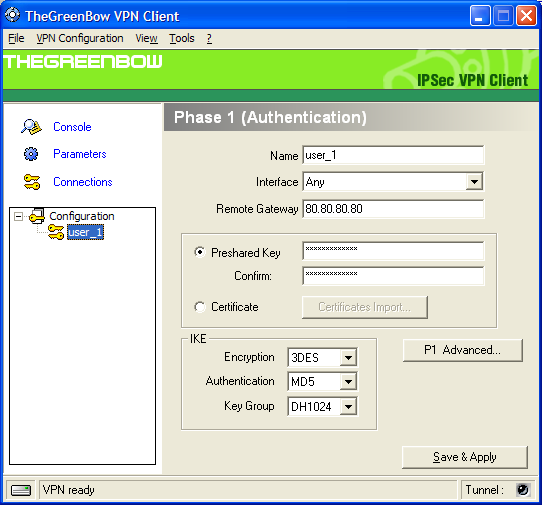
Click the button and configure the following window as explained.
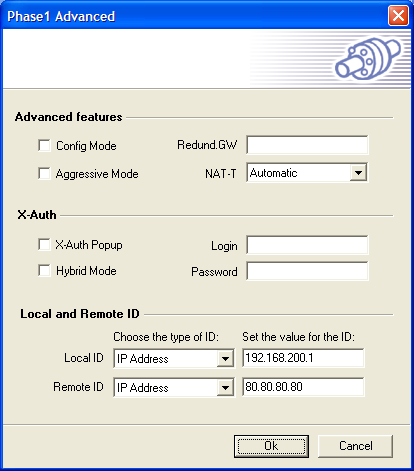
Click the button to close the window.
Click the button to save and initialize the changes made.
Configuration of Phase 2.
In the main window right click on the selected and select .
Configure as shown here below and click the button to save and initialize the changes made.
Then click the button to open the VPN.
When the VPN is active the “Tunnel” light at the bottom becomes green. It's possible to display the status of the connection by clicking on : this window will be shown.
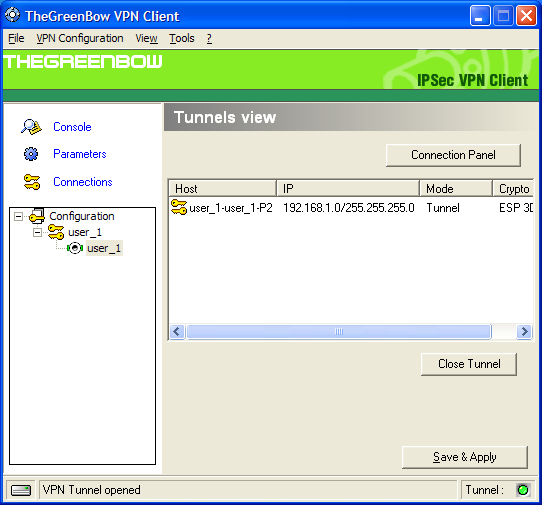
To close the Tunnel, click the button.
![[Tip]](../images/tip.png) | Tip |
|---|---|
Interesting chapter: Section 81.19, “How to configure a Remote Access Server (RAS)”. |
| |  | |
| 89.1. Shrew Soft IPsec VPN client |  | 89.3. iPhone/iPad native IPsec VPN client with Main Mode |