| 76.10. Example: Installation of SmeServer 8.1 | ||
|---|---|---|
 | Chapter 76. HowTo - Abilis VMX |  |
| 76.10. Example: Installation of SmeServer 8.1 | ||
|---|---|---|
| | Chapter 76. HowTo - Abilis VMX | |
To install SmeServer, download the ISO (http://mirror.contribs.org/releases/8.1/iso/i386/smeserver-i386.iso).
Create a new virtual machine by clicking on
Insert the Name, select
LinuxRed
Hat
Select the amount of RAM that you want to use during the setup. When you run this virtual machine on the Abilis-VMX you can choose a different RAM size. Click on .
Select Create a new virtual drive
now
Select VMDK (Virtual Machine Disk) as hard disk
file type and click on .
When the wizard asks if use a dynamically allocated
hard disk file you can leave the default value and click on
.
Write the filename of your disk image and select
the desired size, then click on .
Now you have a new item in the virtual machines list.
Click on it with the and open Settings.
Click on the Storage label and remove both the SATA disk and the SATA controller.
Add a new IDE disk. A window asks if create a new disk or use an existing one. Click on and select the previously created image.
Click on and start the virtual machine by clicking on .
Now, the software asks an optical disk or an ISO file to start the
VM. Choose the smeserver-i386.iso file on your hard disk,
then click on start.
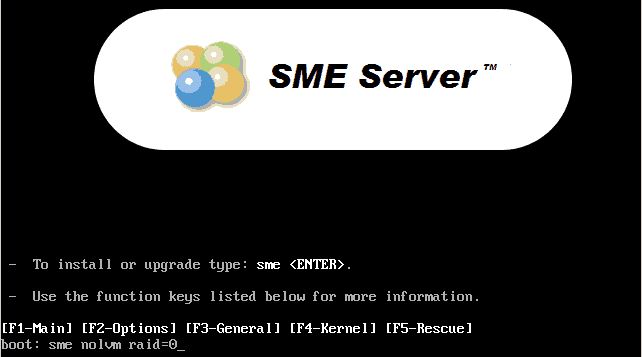
At the boot screen, write sme nolvm raid=0 and press Enter.
Following the instructions on the screen, select the language, the time zone and install the system.
At the first startup, you have to configure the system following the istructions.
Now you can access to the shell. You need to configure the system to run into Xen.
Install the Xen kernel: rpm -ihv /media/cdrom/SME/kernel-xen-2.6.18-371.4.1.el5.i686.rpm
Rebuild the initrd with the Xen modules: mkinitrd --builtin=ata_piix --with=xenblk --with=xennet /boot/initrd-2.6.18-371.4.1.el5xen.img 2.6.18-371.4.1.el5xen -f
Modify the /boot/grub/menu.lst file by changing
the lines under title SME Server (2.6.18-341.4.1.el5xen)
into:
root (hd0,0)
kernel /vmlinuz-2.6.18-371.4.1.el5xen ro root=LABEL=/ nodmraid
initrd /initrd 2.6.18-371.4.1.el5xen.img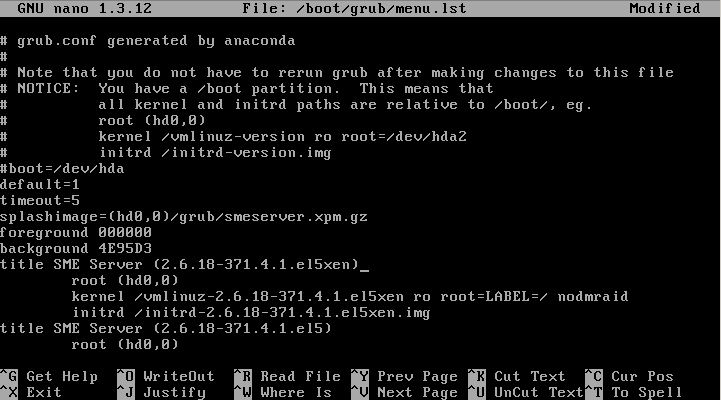
Save and give the poweroff command to shutdown the virtual machine.
Now we have to convert and upload the disk image file of our virtual machine.
Download the qemu-img utility at http://mirror2.mirror.garr.it/mirrors/knoppix/qemu-0.8.1/qemu-img.exe.
Open the Command Prompt and enter into the virtual machine's directory using cd or chdir. I called my VM "SmeServer" and my username is "Luca", so the command is: cd "C:\Users\Luca\VirtualBox VMs\SmeServer".
Now is time to convert the disk image. I saved the
qemu-img.exe utility into the
C:\ root directory, so the command is:
C:\qemu-img.exe convert SmeServer.vmdk
SmeServer.img.
Connect to your Abilis-VMX through SSH. In this example, we assume that the IP address is 192.168.1.1: ssh root@192.168.1.1.
Insert the password and press Enter.
Create a directory for your virtual machine in
/opt/domains: mkdir
/opt/domains/SmeServer.
Using scp or WinScp (http://winscp.net/eng/download.php) copy your .img disk
image file into the previously created directory
(/opt/domains/SmeServer).
Connect to the Abilis-VMX and create a new configuration file for
your paravirtualized machine. Copy the following configuration in
/opt/xen/smeserver_pvm.cfg:
# smeserver_pvm.cfg #
# Example config file for a paravirtualized environment running SmeServer.
# BOOTLOADER: pyGrub is a domU bootloader that allows, like GRUB, the loading
# of kernel and initrd that are into the VM disk image.
# In order to make it run, GRUB 1 must be installed on the VM.
bootloader = '/usr/lib/rtxen-4.1-1/bin/pygrub'

# MEMORY: specify the amount of RAM (MB) to assign at the VM. It couldn't be
# more than the physical RAM on the Abilis
memory = '512'

# DISK: specify the type of disk to use on the virtual machine.
# In this example we are using the disk image located in
# /opt/domains/smeserver/SmeServer.img. We want use that as a hda disk and have
# to be writable (w). The filename is case sensitive.
disk =[ 'file:/opt/domains/SmeServer/SmeServer.img,hda,w' ]

# NAME: the virtual machine name
name = 'smeserver_pvm'

# VIF: This section specifies the virtual inetrfaces to assign at the VM.
# Every interface (ethX) will be named into dom0 as vifY.X, where Y is the
# domain ID.
# Is mandatory assign a unique MAC address to the vif in the same network. If
# it is not specified, rtXen will create a different address at every restart,
# producing potential issues with the DHCP server or internal domU scripts that
# need the MAC address ad a reference (ex: udev). Xen's domU MACs all start
# with 00:06:3E
vif = [ 'mac=00:06:3E:AA:BB:CC' ]

# ON_*: This section defines what to do when the VM is rebooted, turned off,
# destroyed or recovered after a system crash.
# Is also specified the behavior at start/stop of the Xen daemon.
on_poweroff = 'destroy'
on_reboot = 'restart'
on_crash = 'restart'
on_xend_start = 'start'
on_xend_stop = 'shutdown'

# EXTRA: Is possible to add extra parameters to give to the kernel at startup.
# Adding extra='clocksource=jiffies' you can avoid some issues with the domU's
# system clock. More informations at:
# http://bugzilla.xensource.com/bugzilla/show_bug.cgi?id=1098
extra='clocksource=jiffies'
Before running the virtual machine, another modify is needed. We need to access to the files into the disk image.
Create a directory, where mount the image: mkdir /opt/domains/SmeServer/loop.
Find the start of the partition to mount: fdisk -lu /opt/domains/SmeServer/SmeServer.img.
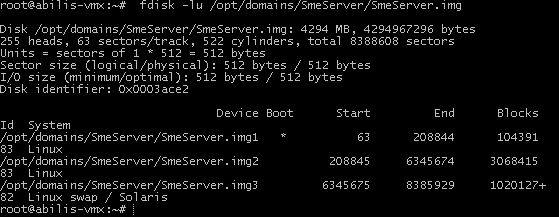
We want to access to the second partition. It starts at 208845, but it's the sector number. We want to know at what byte the partition starts, so we have to multiply this number by 512. The second partition starts at the 106928640th byte.
Associate the image to a loop device (we'll use loop0): losetup -o 106928640 /dev/loop0 /opt/domains/SmeServer/SmeServer.img.
Mount the image into the previously created directory: mount /dev/loop0 /opt/domains/SmeServer/loop.
Now we have to change the default output shell to xvc0.
Open /opt/domains/SmeServer/loop/etc/inittabs
and replace the following line:
1:123457:respawn:/sbin/mingetty tty1
with this one:
1:123457:respawn:/sbin/mingetty xvc0
Open /opt/domains/SmeServer/loop/etc/securetty
and add xvc0 at the end of the file.
Unmount the device using: umount /opt/domains/SmeServer/loop.
Disconnect the image from loop0 using: losetup -d /dev/loop0.
Start the virtual machine and connect to the console: xm create -c /etc/xen/smeserver_pwm.cfg.
Now you can use your paravirtualized SmeServer machine.
| |  | |
| 76.9. How to create a sparse file |  | Chapter 77. HowTo - OPC panel - Enduser manual |