| 89.7. Ubuntu Cisco VPN Client | ||
|---|---|---|
 | Chapter 89. IPsec clients |  |
| 89.7. Ubuntu Cisco VPN Client | ||
|---|---|---|
| | Chapter 89. IPsec clients | |
You need to install network-manager-vpnc, then configure it through network manager.
sudo apt-get install network-manager-vpncIf you have a version of UBUNTU 18.04 or bigger, then use this comand.
sudo apt install vpnc network-manager-vpnc-gnomeThis table show the parameters of Ubuntu Cisco VPN Client and their corresponding parameters in Abilis configuration.
Table 89.8. Checklist of parameters
| The Ubuntu Cisco VPN client parameter | Abilis IKE Table | Abilis IKE Table parameter |
|---|---|---|
| Server | HOST | LOC-IP |
| Account | HOST | XAUTH-USER |
| Password | HOST | XAUTH-PWD |
| Group Name | HOST | KEY-ID |
| Secret | PSK | KEY |
Suppose that Abilis is configured in the following way. Refer to Section 81.19.1, “How to configure a RAS using IPSEC VPN server” to for the configuration of IPsec and IKE resources.
[14:52:09] ABILIS_CPX:d ike host:0------------------------------------------------------------------------------- HOST: NAME: LIFETIME: HASH: DPD: DPD-ACTION: LOCIP: NATT: MODE: MODE-CFG: DH: DPD-DELAY: REMIP: SIDE: AUTH: XAUTH: CIPHER: SA-TRY: DPD-TOUT: XAUTH-USER: XAUTH-PWD: -- PSK ID --------------------------------------------------------------- ID-TYPE: IP:/ID: PEER-ID-TYPE: PEER-IP:/PEER-ID: -- RSA Cert ------------------------------------------------------------- CERT-SEND: ASN1-DN: CERT-PEER: PEER-ASN1-DN: CERT-VERIFY: ------------------------------------------------------------------------------- 0 User_1_Ubuntu 3600 SHA1 YES STOP 188.138.018.018 SYS AGGRESSIVE REQUEST MODP1024 30 * AUTO PSK SERVER AES256 3 120 user1 ******** -- PSK ID --------------------------------------------------------------- LOCIP KEY-ID mykey2020 ------------------------------------------------------------------------------- [14:43:16] ABILIS_CPX:d ike cli:0------------------------------------------------------------------------------- CLI: NAME: LIFETIME: ESP: AH: HOST: NET-LOC: RULE: PASSIVE: PFS: ESP-AUTH: AH-AUTH: NET-REM: PERMANENT: TUNNEL: ESP-CIPHER: MODE-CFG-DNS: ------------------------------------------------------------------------------- 0 User_1_Ubuntu_cli 28800 YES NO 0 000.000.000.000/00 IPSEC YES YES SHA1 SHA1 192.168.200.001/32 YES YES AES128 008.008.008.008 ------------------------------------------------------------------------------- [14:12:48] ABILIS_CPX:d ike psk:0------------------------------------------------------------------------------- PSK: KEY: PEER-ID-TYPE: PEER-IP:/PEER-ID: ------------------------------------------------------------------------------- 0 ******** KEY-ID mykey2020
To configure an Ubuntu Cisco VPN connection with Abilis, follow these settings:
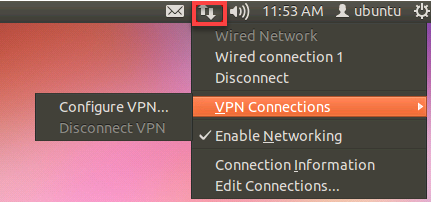
Now you need to left click on your network manager applet (Located in your notification area) And choose "Configure VPN...":
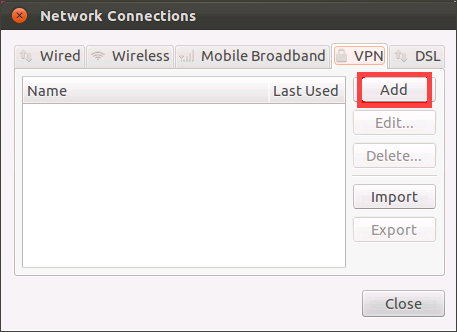
Now you need to click on "Add":
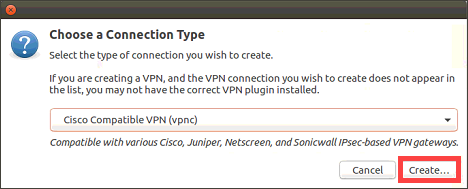
Choose VPN connection type as "Cisco Compatible VPN(VPNC)" and click on "Create":
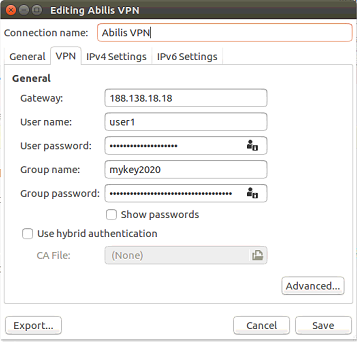
Enter Abilis details and click "Save".
To start your VPN, just follow the steps again, but instead of "Configure VPN", you'll click on the entry you created.
| |  | |
| 89.6. Android FortiClient VPN Client |  | Chapter 90. PPPoE clients |
![[Tip]](../images/tip.png)