| 80.19. How to configure a Remote Access Server (RAS) | ||
|---|---|---|
 | Chapter 80. HowTo - Networking |  |

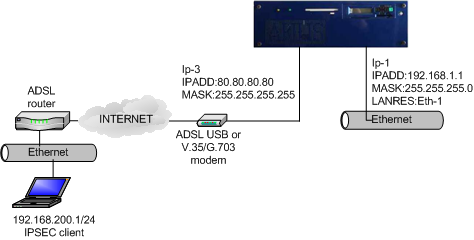
Enter into the Abilis control-program or open the configuration file with the Console configurator and type the following commands.
| a
res:ipsec or s act res:ipsec | Add the IPSEC resource. or If the resource already exists, set it active. |
| s p ipsec act:yes | Enable the IPSEC runtime functionalities. |
| a
res:ike or s act res:ike | Add the IKE resource. or If the resource already exists, set it active. |
| s p ike act:yes | Enable the IKE runtime functionalities. |
| s p ip-3 ipsec:yes | Enable the IPSEC functionality in the IP resource associate to the WAN connection (e.g. IP-3). |
| Add an entry in the IKE Host and IKE Client tables for each client that you want to enable. | |
| a ike host:0 name:user_1 | Add an entry in the IKE Host table. |
| s ike host:0 loc-ip:80.80.80.80 rem-ip:* | Configure the local and remote IP addresses. |
| s ike host:0 auth:psk hash:md5 dh:modp1024 cipher:3des | Configure the authentication type. |
| s ike host:0 side:inside | Configure NAT settings. |
| s ike host:0 id-type:ip ip:80.80.80.80 | Configure the local ID. |
| s ike host:0 peer-id-type:ip peer-ip:192.168.200.1 | Configure the remote ID. |
| a ike cli:0 name:user_1 | Add an entry in the IKE Client table. |
| s ike cli:0 host-id:0 tunnel:yes | Configure the Host ID and enable the tunnel mode. |
| s ike cli:0 net-loc:192.168.1.0/24 net-rem:192.168.200.1/32 | Configure the local and remote addresses and masks. |
| a ipr net:192.168.200.1/32 ip:3 | Add a static route for remote host (if it's necessary). |
| Repeat the previous commands for each client. | |
| a ike psk:0 key:preshared_key id-type:anonymous | Add the Preshared Key. |
| save conf | Save the configuration. |
On a working Abilis, a system restart is required to make the IPSEC and IKE resources running.
![[Caution]](../images/caution.png) | Caution |
|---|---|
The IPSEC connection works ONLY if the LAN, where the PC client is connected to, is different from the LAN of Abilis (e.g. In the previous case if the PC client IP address belongs to the 192.168.1.0/24 the IPSEC connection doesn't work!). |
![[Tip]](../images/tip.png) | Tip |
|---|---|
To configure IPSEC clients refer to Chapter 88, IPsec clients. |

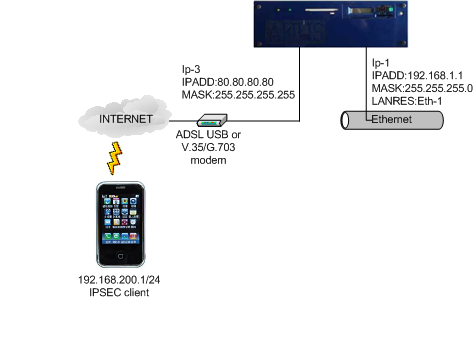
Enter into the Abilis control-program or open the configuration file with the Console configurator and type the following commands.
| a
res:ipsec or s act res:ipsec | Add the IPSEC resource. or If the resource already exists, set it active. |
| s p ipsec act:yes | Enable the IPSEC runtime functionalities. |
| a
res:ike or s act res:ike | Add the IKE resource. or If the resource already exists, set it active. |
| s p ike act:yes | Enable the IKE runtime functionalities. |
| s p ike nrty:5 | Set the maximum number of packet retransmissions. |
| s p ip-3 ipsec:yes | Enable the IPSEC functionality in the IP resource associate to the WAN connection (e.g. IP-3). |
| Add an entry in the IKE Host and IKE Client tables for each client that you want to enable. | |
| a ike host:0 name:test | Add an entry in the IKE Host table. |
| s ike host:0 loc-ip:80.80.80.80 rem-ip:* | Configure the local and remote IP addresses. |
| s ike host:0 auth:psk hash:md5 dh:modp1024 cipher:3des | Configure the authentication type. |
| s ike host:0 side:inside | Configure NAT settings. |
| s ike host:0 xauth:server xauth-user:test xauth-pwd:password | Set host connection. |
| s ike host:0 mode-cfg:srv-request | Set the type of mode. |
| s ike host:0 dpd-action:restart | Set the ime interval of missing DPD replies after which peer is declared dead. |
| a ike cli:0 name:test | Add an entry in the IKE Client table. |
| s ike cli:0 host-id:0 tunnel:yes pfs:no | Configure the Host ID, enable the tunnel mode and disable Perfect Forward Secrecy |
| s ike cli:0 net-loc:0.0.0.0/0 net-rem:192.168.200.1/32 | Configure the local and remote addresses and masks. |
| a ipr net:192.168.200.1/32 ip:3 | Add a static route for remote host (if it's necessary). |
| Repeat the previous commands for each client. | |
| a ike psk:0 key:preshared_key id-type:anonymous | Add the Preshared Key. |
| save conf | Save the configuration. |
![[Tip]](../images/tip.png) | Tip |
|---|---|
To configure iPhone/iPad native VPN IPsec client refer to Section 88.3, “iPhone/iPad native IPsec VPN client”. |

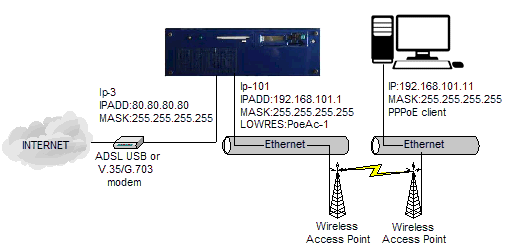
Enter into the Abilis control-program or open the configuration file with the Console configurator and type the following commands.
| a res:poeac-1 | Add a POEAC resource (e.g. POEAC-1). |
| s p poeac-1 act:yes | Enable the POEAC-1 runtime functionalities. |
| s p poeac-1 ethres:eth-1 | Configure the Eth-1 as the POEAC-1 lower resource. |
| s p poeac-1 max-ipres:10 | Configure the maximum number of clients. |
| s p poeac-1 acname:wlan descr:wlan_users | Configure the name of the Access Concentrator and the description of the POEAC-1 resource. |
| Add an IP over PPP resource and an user in the Users Table for each client that you want to enable. | |
| a res:ip-101 subtype:ppp | Add an “IP over PPP” resource (e.g. IP-101). |
| s p ip-101 lowres:poeac-1 | Configure the POEAC-1 as the IP-101 lower resource. |
| s p ip-101 ipadd:192.168.101.1 | Configure the PPPoE server IP address. |
| s p ip-101 neigh:192.168.101.11 | Configure the PPPoE client IP address. |
| s p ip-101 servicename:user_1 | Configure the PPPoE Service name. |
| s p ip-101 tcp-mss-clamp:yes | Activate the TCP MSS clamping procedure. |
| s p ip-101 dns:provide | Provide the DNS service to the client. |
| s p ip-101 local:none remote:chap | Configure the local and remote authentication protocol. |
| s p ip-101 descr:user_1 | Configure the description of the IP resource. |
| a user:user_1 pwd:user_1 | Add the user in the Users Table. |
| s user:user_1 ppp:yes ppp-res:ip-101 | Enable the user to PPP service and associate the user to the IP-101 resource. |
| Repeat the previous commands for each client. | |
| s p iprtr PPP-DNS-PRI:62.94.0.1 PPP-DNS-SEC:62.94.0.2 | Configure the DNS servers provided to the remote clients. |
| save conf | Save the configuration. |
On a working Abilis, a system restart is required to make the POEAC-1 and IP resources running.
![[Tip]](../images/tip.png) | Tip |
|---|---|
Remember to configure NAT settings. |
![[Tip]](../images/tip.png) | Tip |
|---|---|
To configure PPPoE clients refer to Chapter 89, PPPoE clients. |
Physical connections:
Verify that an ISDN card (QPRIX, PB44X, BRI-HFC4, BRI-HFC8) is installed in the Abilis. If the card isn't present, insert it in a free PCI slot.
Connect the ISDN card to NT devices.
The remote PC must be connected to an ISDN router or to a TA adapter able to generate ISDN calls.

Enter into the Abilis control-program or open the configuration file with the Console configurator and type the following commands.
| Add an “IP over PPP” resource for each client that you want to enable. | |
| a res:ip-201 subtype:ppp | Add an “IP over PPP” resource (e.g. IP-201). |
| s p ip-201 lowres:ctislink | Configure the CtiSlink as the lower resource. |
| s p ip-201 dial-in:yes dial-out:no | Enable the incoming calls and disable the outgoing calls. |
| s p ip-201 cgi:01765432 | Configure the calling number. |
| s p ip-201 ipadd:192.168.201.1 | Configure the server IP address and mask. |
| s p ip-201 neigh:192.168.201.11 | Configure the client IP address. |
| s p ip-201 username:provider_user password:provider_pwd | Configure the login information. |
| s p ip-201 tcp-mss-clamp:yes | Activate the TCP MSS clamping procedure. |
| s p ip-201 dns:provide | Provide the DNS service to the client. |
| s p ip-201 local:none remote:chap | Configure the local and remote authentication protocol. |
| s p ip-201 descr:user_1 | Configure the description of the IP resource. |
| Repeat the previous commands for each client. | |
| s p iprtr PPP-DNS-PRI:62.94.0.1 PPP-DNS-SEC:62.94.0.2 | Configure the DNS servers provided to the remote clients. |
| save conf | Save the configuration. |
On a working Abilis, a system restart is required to make the IP resources running.
![[Tip]](../images/tip.png) | Tip |
|---|---|
Remember to configure NAT settings. |