Step-by-step instructions for user management, system configuration, backups and security.
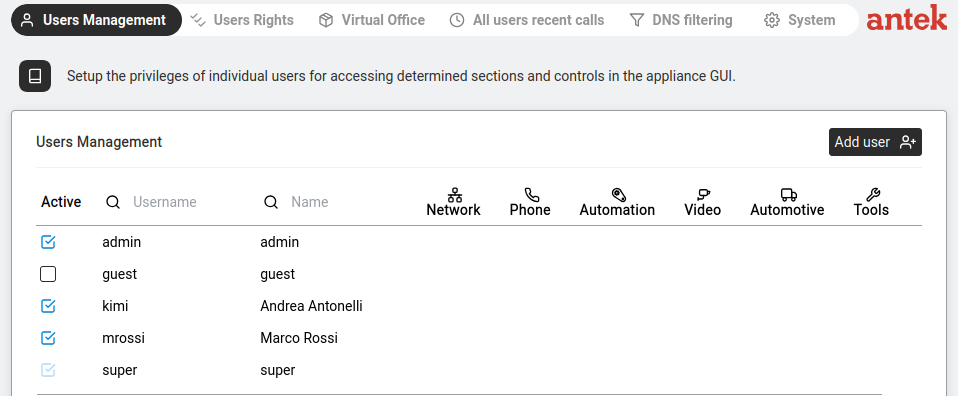
Administration has six tabs: Users Management, Users Rights, Virtual Office, All users recent calls, DNS filtering, System.
Log in for the first time and change the default password
Goal: Log into the Abilis web interface for the first time after installation and immediately change the default password so only you can access the system.
Connect your computer to the Abilis LAN port with an Ethernet cable.
Open a browser and go to http://192.168.1.1 (the factory default address).
Log in with:
Username:admin
Password:PWDS followed by the serial number printed on the unit (e.g. PWDS1919010).
Immediately change the password:
Go to Administration > Users Management.
Click on the admin user.
On the Basic Parameters tab, change the password.
Click Save.
Do not leave the default PWDS password in place. Anyone who knows the serial
number of your unit (visible on the case) could log in.
Goal: Create a new user account so that an employee can log into the Abilis web interface, use a phone extension or access specific features based on their role.
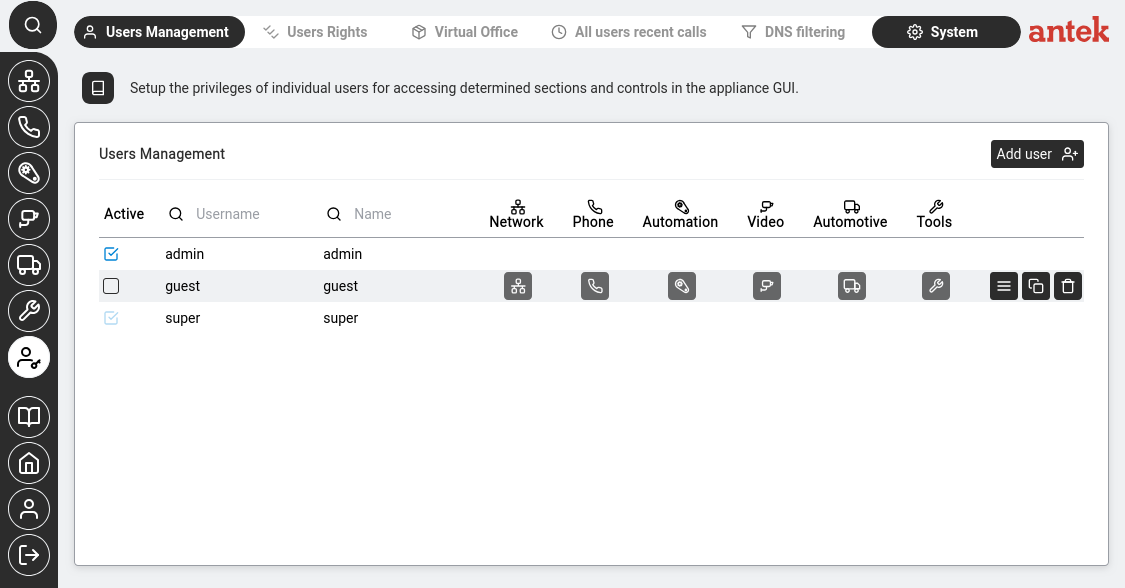
Users Management — user list with privilege icons per section.
Go to Administration > Users Management.
Click Add user.
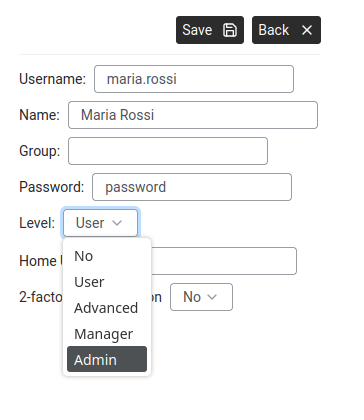
Add user — Username, Name, Group, Password, Level dropdown.
Fill in:
Username: the login name (e.g. maria.rossi). No spaces allowed.
Name: the person's full name (e.g. "Maria Rossi").
Group: optional — assign to a user group.
Password: choose a strong password.
Level: the access level (HTTP-LEVEL). Choose from:
NO — account cannot log in to the web interface.
USER (BASIC in v9.0 reference manual) — basic access (phone, address book only).
ADVANCED — user, plus read-only access to the Control Port (diagnostics).
MANAGER — can manage some users and settings.
ADMINISTRATOR — full configuration access to all pages.
SUPER — unrestricted; reserved for the super account.
2FA (2-factor authentication): enable for extra security (No by default).
Click Save.
Assign privileges to a user
Goal: Control what each user can see and do in the Abilis web interface — for example, giving the receptionist access to Phone and OPC Panel but not to Networking or Administration.
Even an Admin-level user sees nothing until you enable specific sections.
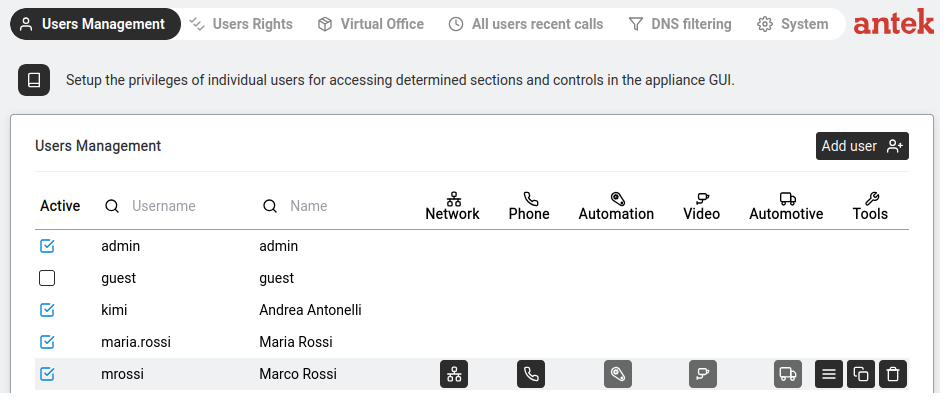
Users Management — privilege icons appear next to users who have sections enabled.
Go to Administration > Users Management.
Click on a user to open their settings.
Click the Privileges tab.
Six sub-tabs appear — one for each section:
Network — access to Networking. Also controls: FTP Enabled checkbox, FTP home directory.
Phone — access to Phone (SIP extension, call management).
Automation — access to Automation (control panels, loops, monitoring).
Videorecorder — access to video feeds and recordings.
Automotive — access to fleet management.
Tools — access to audio messages, SMS, DISA, disk, CPU.
On each sub-tab, tick the "Access to…" checkbox to enable that section.
Additional options may appear below (e.g. FTP settings for Network).
Click Save.
A typical office employee needs: Level = User, Phone = enabled (with SIP number), everything else off.
An IT administrator needs: Level = Admin, all sections enabled.
Grant a user access to only specific directories (Users Rights)
Goal: You want one user to be able to download call recordings via FTP
— but nothing else on the Abilis filesystem. Or: you want an integrator to read the
configuration export folder but not touch anything else. Privileges (in Users Management)
grant access to sections; Users Rights grants access to paths and
directories within a protocol, which is much finer-grained.
Privileges — "which tabs of the web interface can
this user see?" (broad). Rights — "within the HTTP, FTP or LDAP
protocol this user is allowed on, which specific paths and files can they read or
write?" (narrow). Both apply at once.
You see a table of rules that bind a user (or group) to a protocol and a path,
with specific permissions. Click New +.
Configure the rule:
User / Group: the username (or a group name).
Protocol:FTP (or HTTP / LDAP depending on what you're
restricting).
Path: the directory or file this rule applies to — e.g.
/recordings/ for call recordings, or
/config/ for configuration exports. Use the filesystem paths as
the Abilis sees them.
Rights: tick only what the user needs — typically
read is enough for retrieval; write only if they must upload;
list to let them see directory contents.
Click Save.
Test — log in to the Abilis as that user over FTP. They should be able to navigate
into /recordings/ and download files; attempts to go elsewhere should
be denied.
Rights is strict by default — a user with an FTP privilege but no Users
Rights entries often cannot reach any path. Always create at least one Rights
entry for each protocol the user will use, otherwise you'll see confusing permission-denied
errors.
Goal: Enable encrypted access to the Abilis web interface so that login credentials and all data are protected from eavesdropping on the network.
passwords and data aren't sent in plain text.
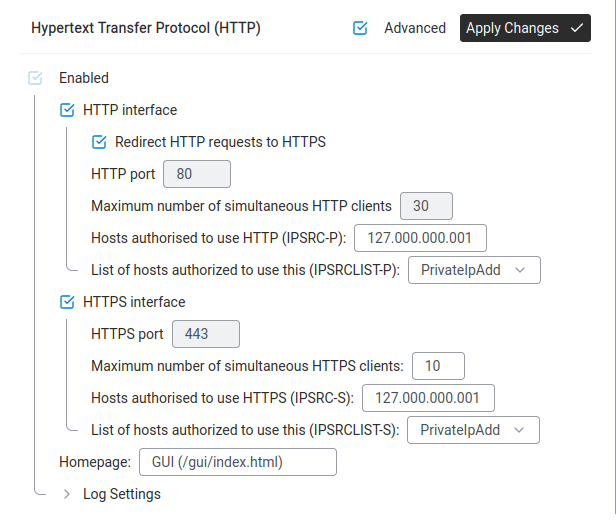
Settings > HTTP — HTTP and HTTPS interfaces with ports, client limits and access control.
Maximum number of simultaneous HTTPS clients:10 (default).
Hosts authorised to use HTTPS (IPSRC-S):127.000.000.001 means localhost only.
Change to 000.000.000.000 or a specific range to allow remote access.
List of hosts authorized (IPSRCLIST-S): select a list (e.g. PrivateIpAdd) to restrict access to known IPs.
Click Apply Changes.
Access the Abilis at https://192.168.1.1. Your browser may show a certificate warning
(because the default certificate is self-signed) — this is normal. Click "Advanced" and "Proceed" to continue.
Goal: You've activated HTTPS (see Activate HTTPS above), but some users
still type http://192.168.1.1 out of habit and land on the unencrypted page.
You want the Abilis to automatically redirect them to the secure https:// version,
so all connections are encrypted — no matter what the user types.
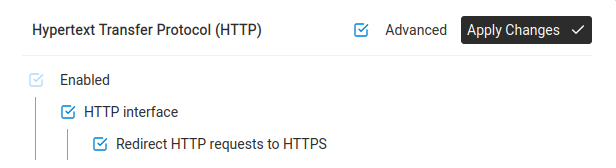
HTTP interface — tick "Redirect HTTP requests to HTTPS".
Under HTTP interface, find the checkbox labelled "Redirect HTTP requests to HTTPS" and tick it.
Click Apply Changes.
Test it. Open a new browser tab and type http://192.168.1.1 (or whatever your Abilis address is, without the "s"). The browser should automatically jump to https://192.168.1.1.
Note: Make sure HTTPS is working properly before enabling this redirect. If HTTPS
isn't configured correctly and you redirect all HTTP traffic to it, you may lock yourself
out of the web interface. If that happens, you'll need to access the Abilis through another
method to undo the change.
Advanced: CLI equivalent
The CLI command sequence for this task is documented in
Chapter 83.28.5 — How to redirect HTTP to HTTPS of the old Abilis manual.
A rewritten CLI guide is in preparation; this link will be updated when it is ready.
Activate SSH for remote administration and file transfer
Goal: You want to be able to reach the Abilis from outside the local
network, or you need a secure way to transfer files to it (typically to upload firmware
packages to the /pkg/ folder, or to pull a configuration backup). SSH gives
you both — an encrypted command-line session and SFTP file transfer on the same port.
SSH (Secure Shell) — an encrypted protocol for remote
login and file transfer. Much safer than Telnet or plain FTP because every byte in the
session is encrypted. Default port is 22.
Learn more.
Who this is for: administrators who occasionally need CLI access for
troubleshooting, or who upload firmware packages as part of the upgrade procedure.
Regular users do not need SSH.
Go to Networking > Settings > Ports.
Look for a resource named SSH in the list. If it is present and
green, SSH is already active — you can skip to step 5 to confirm.
If SSH is not present, click New + and add a resource of type
SSH.
On the SSH resource, make sure Active is ticked. Leave the default
port (22) unless you have a specific reason to change it. Click
Save.
Save the configuration and restart the Abilis — see
Restart the Abilis. SSH only becomes available after the
restart.
Test from another computer. Open a terminal and connect:
ssh super@<abilis-ip>. You should be prompted for the password.
SSH opens an administrative door into the Abilis. If the unit is
reachable from the public internet, make sure brute-force protection is on (see
Protect against brute-force attacks) and consider
restricting SSH to specific source IP addresses via an ACL.
For the exact username/password the SSH server accepts, see
Log in for the first time — the SSH login mode follows the
same user account system as the web interface when LOGIN-MODE:USERS is in use.
Advanced: CLI equivalent
The CLI command sequence for this task is documented in
Chapter 83.25 — How to activate the SSH server of the old Abilis manual.
A rewritten CLI guide is in preparation; this link will be updated when it is ready.
Configure the email sender (SMTP) for alerts and notifications
Goal: Several Abilis features send email — the Alert Manager channel
of type E-mail, voicemail-to-email notifications, some Control Loops. For any
of those to reach an inbox, the Abilis needs valid SMTP sender settings: what address
emails come from, and which outgoing mail server to relay through.
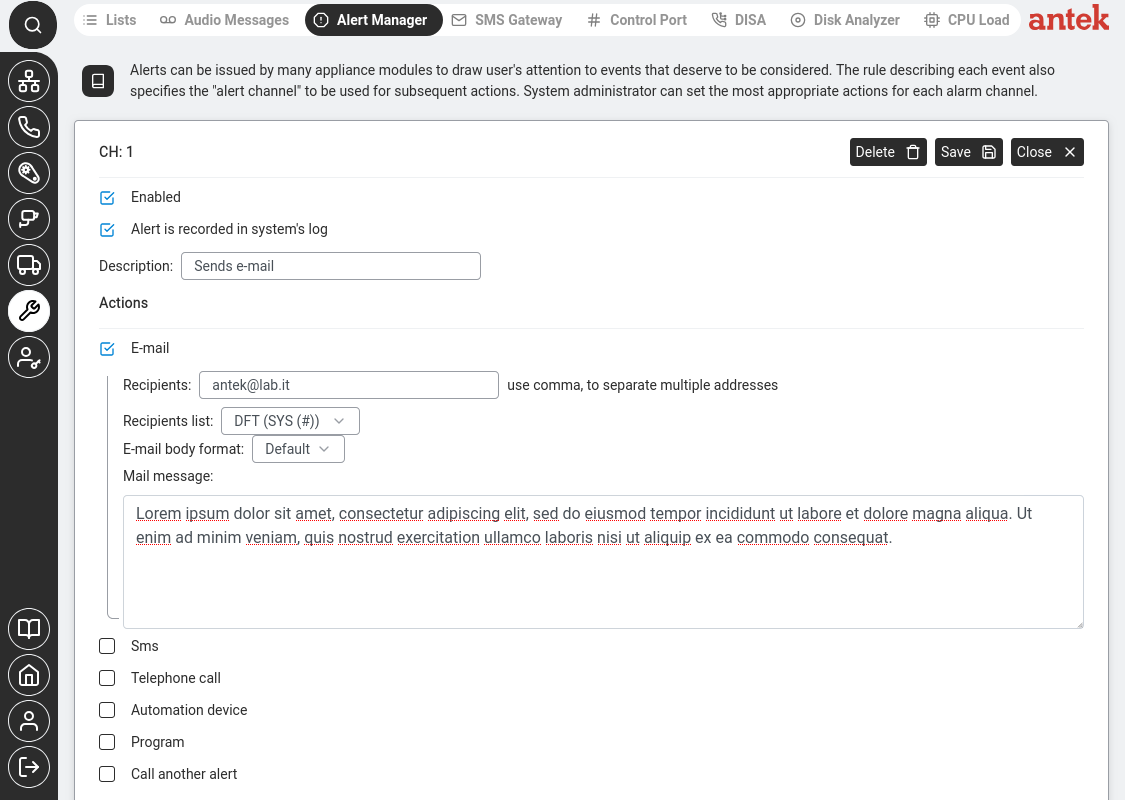
Alert Manager > channel detail. Tick E-mail and fill in the recipient address. The same channel can also trigger SMS, telephone calls, automation devices or chain to another alert.
Obtain the SMTP credentials from the operator of your outgoing mail server:
SMTP server host (e.g. smtp.gmail.com,
smtp.office365.com, your ISP's relay or an internal mail server).
Port — typically 587 (STARTTLS) or 465
(TLS). 25 is rarely accepted now.
Authentication: usually a username (often the same as the
sender address) and a password. Gmail and Office 365 require an
app password, not the main account password.
Sender address — the From that recipients see.
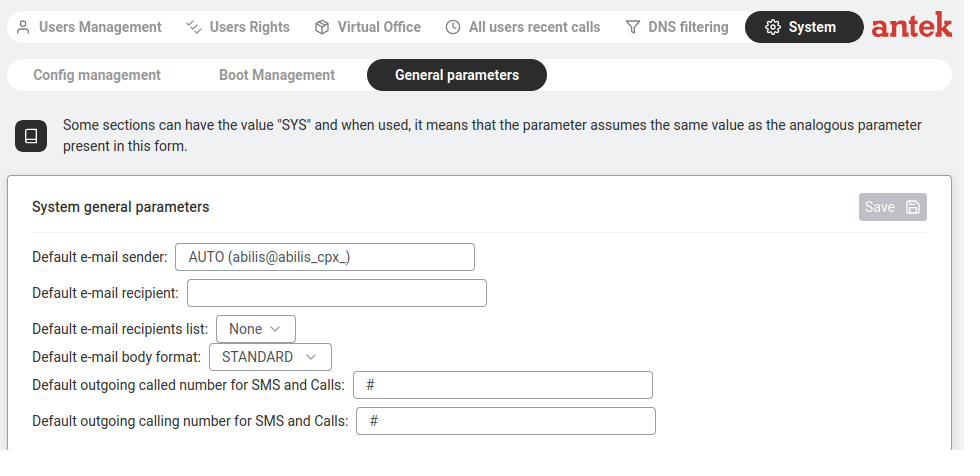
Go to Administration > System > General parameters.
Find the mail-related fields (the label is usually Default e-mail sender
or similar).
Fill in:
Sender address — e.g. abilis@yourcompany.com.
If you leave this as AUTO, the Abilis builds one from its hostname
(abilis@abilis_cpx_), which most mail servers will reject as
unroutable.
SMTP server / port / username / password — the values from
step 1.
Security — choose TLS or STARTTLS to match the server.
Click Save.
Test — attach an email alert channel (see
Set up Alert Manager channels) to a
harmless trigger, and fire it. Check that the email arrives, isn't in spam and
the From looks right.
If the From address doesn't match a domain you own,
receiving mail servers may mark messages as spam or reject them outright. Use a sender
address on your own domain, and if possible set up SPF / DKIM records on that domain to
authorise the SMTP relay you configured above.
Some features have their own separate sender fields (for example
voicemail-to-email). The General parameters value is the system-wide default;
per-feature overrides take precedence when they are set.
Back up and restore the configuration
Goal: You want to save a copy of all your Abilis settings — so that if something goes wrong
(a bad configuration change, a hardware failure, a firmware upgrade that breaks something),
you can get back to a known working state without reconfiguring everything from scratch.
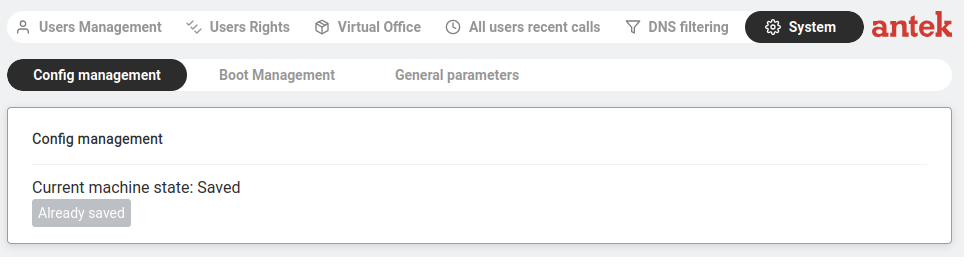
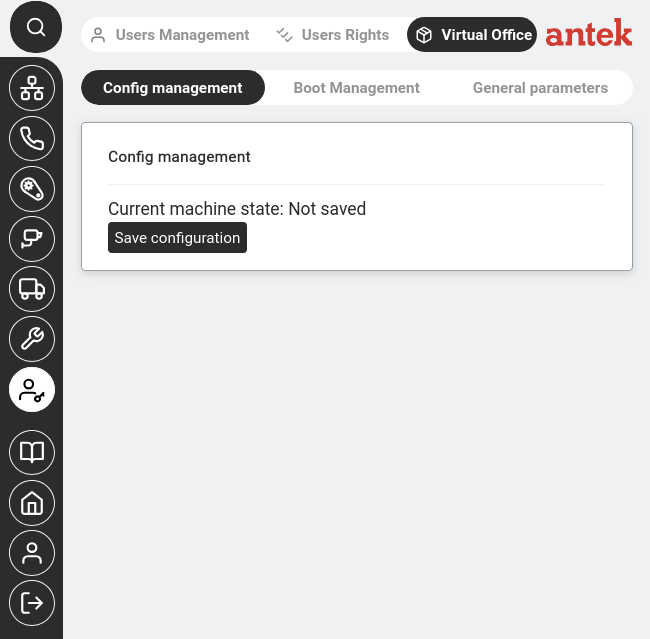
System → Config management — "Already saved" means your settings are safe.System → Config management — "Not saved" means you have unsaved changes. Click "Save configuration" immediately.
Saving your configuration:
Go to Administration → System → Config management.
Check the status. You'll see one of two states:
Status
What it means
Saved (button shows "Already saved")
All your current settings are written to disk. You're safe.
Not saved
You've made changes that exist only in memory. If the Abilis restarts now, those changes will be lost.
If Not saved, click the save button. Wait for the status to change to "Saved".
When to save: Save your configuration every time you make a change you want to keep.
Get into the habit of checking this page after any settings change — it takes 5 seconds
and can save you hours of reconfiguration.
Important: Always save before rebooting. Always save before a firmware upgrade.
If you're about to make a risky change (firewall rules, network settings), save the working
configuration first — then if the change goes wrong, you have a known-good state to restore.
Regain access when locked out of the admin web interface
Goal: The admin password was forgotten or was changed and not recorded,
and nobody can log in to the web interface to fix anything else. You need to get back
in without reinstalling or losing the configuration.
Before trying anything drastic, try the factory default login. It is
sometimes still accepted even after the password has been changed, depending on the
settings that were applied:
Open the browser and go to the Abilis address.
Try Username:admin and Password:PWDS followed by the unit's serial number — e.g. PWDS1919010
— as documented in Log in for the first time. The serial
number is on the label on the Abilis unit.
If that works, immediately set a new password for the admin user and
store it in a password manager this time.
If the PWDS default does not work, the system has been configured to reject it. The
recovery path depends on what access you still have:
If another admin-level user still exists and is accessible — log
in as that user and reset the locked-out account via
Change or reset another user's password. This is the
easiest case.
If you have physical access to the unit — connect directly via the
console port (or an SSH session if SSH was left enabled) with the SUPERUSER account,
and use that to reset the admin password. The SUPERUSER account is protected by a
different credential set from the web-admin accounts.
If none of the above applies — you are locked out. Contact
Anteklab support with the unit's serial number.
They can provide a recovery procedure specific to the firmware version running on
your unit. Do not perform a factory reset unless instructed — it will
also erase your entire configuration, not just the password.
Add a non-admin recovery account after you regain access — another
user with admin-level privileges, whose credentials are kept in a different password
manager or with a different person. Account lockouts become much less frightening when a
backup key exists.
Upgrade the firmware via the web interface
Goal: Update the Abilis software to a newer version — to get bug fixes, security patches or new features.
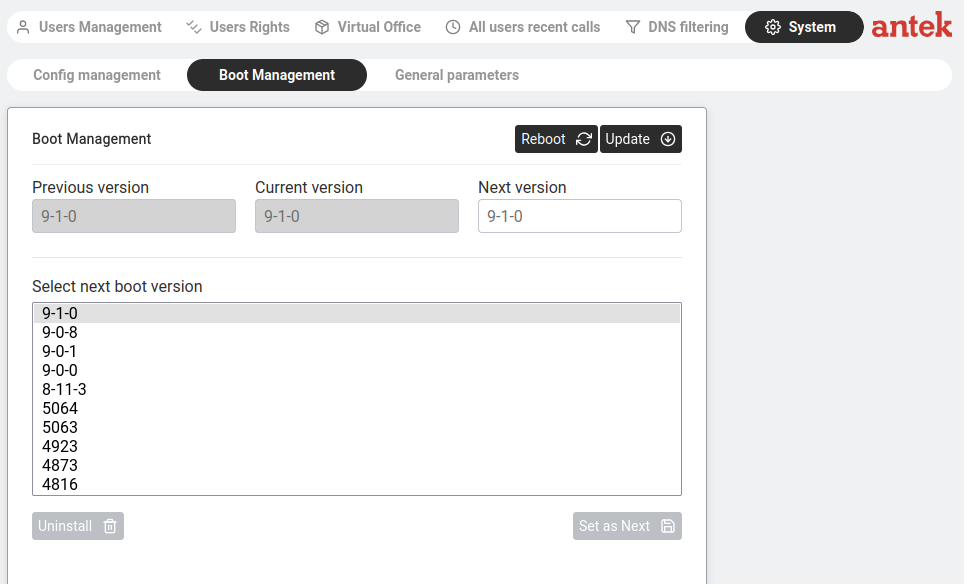
System > Boot Management — version selector with Reboot and Update buttons.
Go to Administration > System > Boot Management.
The page shows: Previous version, Current version, Next version.
Below, Select next boot version lists all installed firmware versions.
To upload a new firmware: click Update and follow the prompts.
To switch to a different installed version: select it in the list, click Set as Next,
then click Reboot.
To remove an old version: select it and click Uninstall.
Always back up your configuration before upgrading firmware (see above).
If the new firmware has issues, you can reboot into the previous version.
Goal: You need to restart the Abilis — for example, after a firmware upgrade, after changing
a setting that requires a reboot or because something is behaving unexpectedly and a restart
may fix it (the networking equivalent of "turn it off and on again").
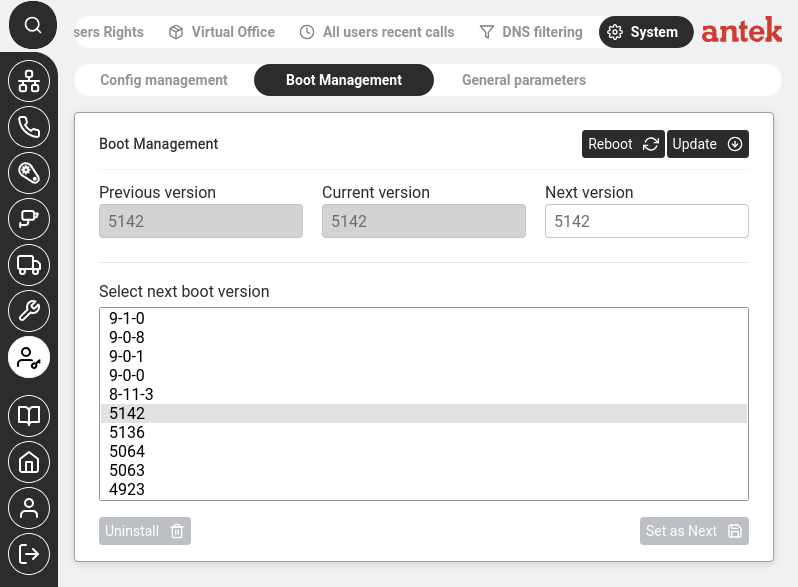
Admin > System > Boot Management. Click Reboot to restart the appliance. You can also select which firmware version to boot next.
Save your configuration first. Go to Administration → System → Config management.
If the status shows "Not saved", click the save button. If it shows "Already saved", you're good.
This is critical — unsaved changes are lost when the Abilis restarts.
Go to Administration → System → Boot Management.
Click Reboot. The Abilis will begin shutting down and restarting.
Wait 1–2 minutes. During this time, all internet connections, phone calls and VPN tunnels
will be interrupted. The web interface will be unreachable.
Refresh the page. After 1–2 minutes, refresh your browser. When the login page appears,
the Abilis is back online.
Warning: A reboot disconnects everyone — all users lose internet, all active phone calls are dropped,
all VPN tunnels go down. Plan reboots during a maintenance window (lunch break, after hours), not during
business hours. Warn your colleagues before pressing the button.
Advanced: CLI equivalent
The CLI command sequence for this task is documented in
Chapter 83.7 — How to restart the Abilis of the old Abilis manual.
A rewritten CLI guide is in preparation; this link will be updated when it is ready.
View system information
Goal: Check basic information about your Abilis: which firmware version is running, how long it has been on since the last restart, the serial number and overall system status.
System > General parameters — default email/SMS settings and alert configuration.
The home page (the dashboard you see right after logging in) shows the quick-glance fields: device name, Serial Number, Firmware version. The figure above shows the deeper page mentioned next.
For system-wide settings, go to Administration > System > General parameters.
Here you can configure:
Default e-mail sender: the address alerts are sent from. AUTO builds one from the unit's hostname (abilis@<hostname>).
Default e-mail recipient: where alerts are delivered.
Default e-mail recipients list: a list (from Tools > Lists) of multiple recipients.
Default e-mail body format:STANDARD or SMS-LIKE (a short SMS-sized summary instead of the full body, per v9.0 ch42.1).
Default outgoing called/calling number for SMS and Calls: the numbers used for alarm notifications.
Click Save.
These are the system-wide defaults. The note on the page says: "Some sections can have
the value 'SYS' and when used, it means the parameter assumes the same value as the analogous parameter
present in this form." This means individual features (IP Ban alerts, ARP alerts, etc.) inherit these
defaults unless overridden.
Change the Abilis device name (hostname)
Goal: By default every Abilis reports itself as ABILIS_CPX
— which becomes confusing the moment you manage more than one unit. Giving each Abilis
a meaningful name (HQ-Milan, Warehouse-1, Villa-Gate) makes
logs, alerts and support tickets much easier to attribute to the right site.
Where the name shows up: the browser title, the SSH login prompt, the
SYSLOG messages sent to a remote server and the From field of email alerts.
Go to Administration > System > General parameters.
System > General parameters — where the device name and other system-wide defaults live.
Find the Device name (or Hostname) field.
Enter a new name. Rules:
Letters, digits, hyphens and underscores only — no spaces or special characters.
Keep it under about 30 characters so it displays cleanly in logs.
Make it unique across your estate so every log line can be traced to one unit.
Click Save. The change takes effect immediately for new log entries
and sessions; existing browser tabs may need a refresh.
If you already forward logs to a central SYSLOG server (see
Forward logs to a SYSLOG server), the new hostname will appear
there too — which is the whole point when you have several Abilis units logging to one
place.
View the boot log
Goal: Something isn't working after a restart — phones aren't registering, internet isn't connecting,
or a feature that was working before is now missing. The boot log tells you exactly what happened
when the Abilis started up: which services loaded successfully, which ones failed and why.
Go to Administration → System. Click the Administration icon, then System.
Look for the boot or startup log section. This shows a chronological list of everything that happened during the last boot: services starting, resources being loaded and any errors.
Scan for problems. Look for lines containing FAILED, ERROR or WARNING. These tell you what went wrong.
Common issues and what to do:
What you see in the log
What it means
What to do
A service shows "FAILED"
That service couldn't start — usually a configuration problem.
Go to the relevant Settings page and check the configuration for that service.
"Licence" error
A feature requires a licence that's missing or expired.
Check with your Anteklab contact about your licence status.
The resource needs to be enabled — see the relevant how-to section.
Tip: If you need to report a problem to Anteklab support,
copy the relevant error lines from the boot log and include them in your message.
This saves time because the support engineer can see exactly what happened without
needing to connect to your Abilis.
Advanced: CLI equivalent
The CLI command sequence for this task is documented in
Chapter 83.23 — How to view the boot log of the old Abilis manual.
A rewritten CLI guide is in preparation; this link will be updated when it is ready.
Goal: You already run a central log collector (Graylog, rsyslog,
Splunk, Wazuh or a plain syslogd server) for all your network equipment.
You want the Abilis to stream its events — logins, failed authentications, VPN state
changes, alarms, resource restarts — to that collector so they sit alongside logs from
everything else.
SYSLOG — a standard protocol for computers to send log
messages over the network to a central server. The server stores them, lets you search
across time and hosts and usually raises alerts on patterns ("5 failed logins in
10 minutes").
Learn more.
What you need before you start: the IP address of your syslog server
(for example 192.168.0.100). The server must be reachable from the Abilis
and must accept inbound UDP on port 514 (the SYSLOG default).
Go to Networking > Settings > Ports and check that
a SYSLOG resource is present. If not, click New +
and add one.
Hostname: the name this Abilis will use to identify itself to
the server. If you have already set a device name (see
Change the Abilis device name), use the same value
here.
Receiver 1: the IP address of your syslog server
(e.g. 192.168.0.100).
Receiver 2 / 3 (optional): additional servers if you want
redundant logging.
Verify on your syslog server that messages from the Abilis are arriving. On a
Linux syslog server the quickest check is
tail -f /var/log/syslog | grep <abilis-hostname>.
SYSLOG carries event metadata — "VPN Ip-7 went down", "user admin logged
in from 192.168.1.50", "IP ban added" — not the contents of files or call recordings. No
sensitive call data leaves the Abilis through SYSLOG.
Goal: Enable the FTP server so you can upload and download files (firmware packages, audio messages, backups) using an FTP client like FileZilla.
(e.g. FileZilla, WinSCP or the file manager built into Windows and macOS).
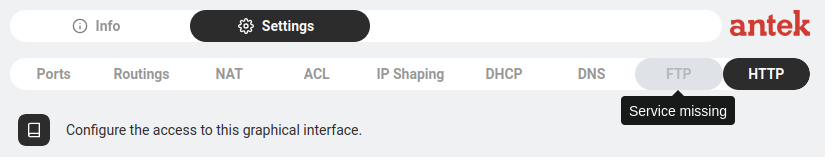
Settings > FTP tab — shows "Service missing" if the FTP resource is not activated.
If you see the FTP settings form, the resource is already active — skip to Step 2.
If the tab shows "Service missing", the FTP resource needs to be activated first.
This is a one-time setup that requires access to the Abilis control program (CLI).
Maximum number of simultaneous FTP clients:6 (increase if needed).
Maximum number of simultaneous SSL FTPS clients:2 (for encrypted connections).
Authorised hosts to use this FTP (IPSRC):127.000.000.001 means localhost only.
Change to 000.000.000.000 to allow connections from any LAN device, or enter a specific IP.
List of hosts authorised to use this FTP (IPSRCLIST): select a list
(e.g. FTPru) to restrict access to known IPs.
Go to Administration > Users Management, click a user.
Go to the Privileges > Network tab.
Tick FTP Enabled and optionally set an FTP home directory.
Click Save.
To connect, use any FTP client with the Abilis IP address, port 21
and the user's login credentials. For encrypted transfers, use FTPS (FTP over SSL).
Advanced: CLI equivalent
The CLI command sequence for this task is documented in
Chapter 83.29 — How to activate the FTP server of the old Abilis manual.
A rewritten CLI guide is in preparation; this link will be updated when it is ready.
Create a list (IP addresses, phone numbers, etc.)
Goal: Create a reusable list of IP addresses, phone numbers or domains that you can reference from firewall rules (ACL), NAT rules, DNS filtering, call routing and other features — instead of typing the same values into every rule that needs them.
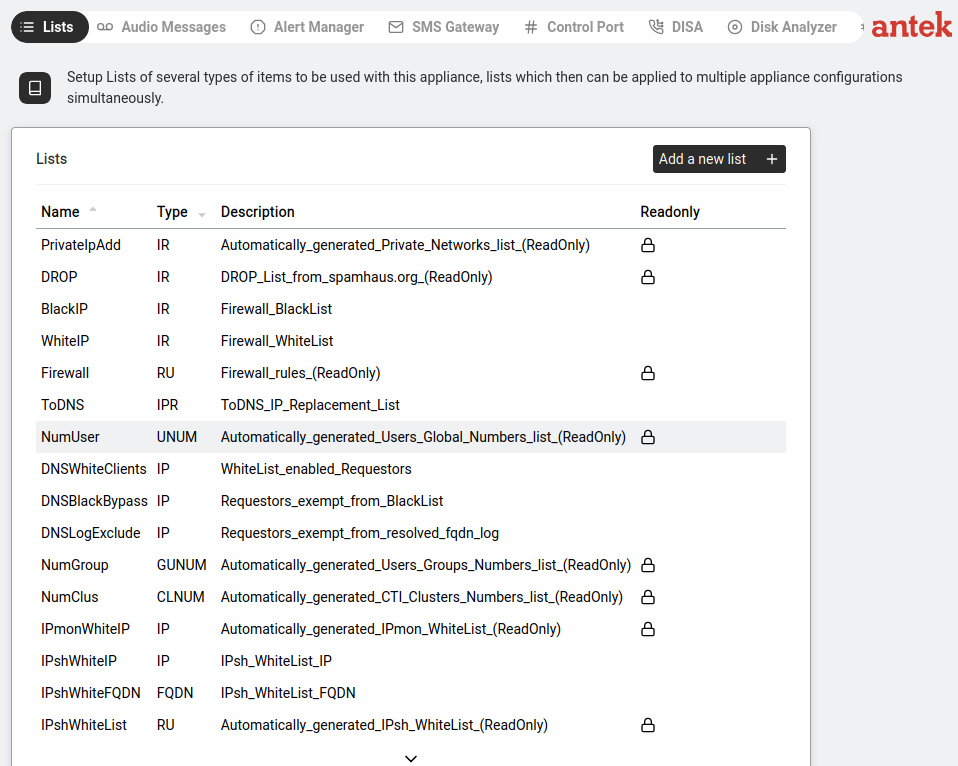
Tools → Lists — all configured lists with Name, Type and Description. Lists with a lock icon are system-generated and read-only.
Go to Tools > Lists.
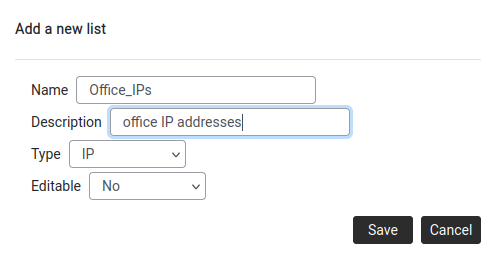
Click Add a new list +.
Add a new list — Name, Description, Type dropdown, Editable option.
Fill in:
Name: a short identifier (e.g. Office_IPs). Used when referencing the list in quotes in ACL/NAT rules.
Description: a human-readable label (e.g. "office IP addresses").
Type: what kind of entries the list holds (IP, IR, FQDN, UNUM, etc.).
Editable: No (read-only) or Yes (can be modified later).
Click Save.
The list appears in the table. Click on it to add entries.
Some lists are auto-generated by the system (marked ReadOnly with a lock icon).
These are used internally — you can view them but not modify them. User-created lists
are fully editable.
Advanced: CLI equivalent
The CLI command sequence for this task is documented in
Chapter 83.30 — How to create a list of the old Abilis manual.
A rewritten CLI guide is in preparation; this link will be updated when it is ready.
Change or reset another user's password
Goal: An employee has forgotten their password and can no longer log into the Abilis web interface,
or you want to change a user's password for security reasons. As an administrator, you can set a new password for any user.
Go to Administration → Users Management. Click the Administration icon in the sidebar, then Users Management. You will see the list of all user accounts.
Click on the user whose password you want to change. Their settings page will open.
Find the password field. Under Basic Parameters, look for the Password field. It will be masked (shown as dots).
Type the new password. Clear the field and type the new password. Choose something the user can remember, but not obvious — at least 8 characters mixing letters and numbers is recommended.
Save. Click Apply Changes.
Tell the user. Let the employee know their new password. They should change it to something personal after their first login by going to Tools → Password (if available) or asking you to update it again.
Important: Only users with Administrator privileges can change other users' passwords. If you are logged in as a regular user, you will only be able to change your own password.
Advanced: CLI equivalent
The CLI command sequence for this task is documented in
Chapter 83.24 — How to change the login passwords of the old Abilis manual.
A rewritten CLI guide is in preparation; this link will be updated when it is ready.
Temporarily disable a user account without deleting it
Goal: A colleague is on extended leave, an employee is between roles,
or a contractor has finished a short engagement. You want to stop them logging in or
receiving calls — immediately — but not destroy the account, its recent-calls history,
address book and preferences. When they come back, or when the audit is done, you
want to re-enable it in one click.
Admin > Users Management. The Active tick-box controls whether each account can log in. Here the "guest" account is disabled (unticked).
Go to Administration > Users Management.
In the user list, find the row of the person you want to disable.
Untick the Active checkbox on that row.
The account immediately stops accepting logins (web, SIP, SSH).
Any SIP phone registered under that user un-registers on its next
keep-alive.
Calls to the user's extension go to the configured no-answer destination
(voicemail, group or a busy signal) depending on existing CTI routings.
Click Save.
When the person returns, repeat the steps and tick Active again.
Everything — password, extension number, privileges, address book, recordings — is
still there and works as before.
For a complete audit trail before disabling, export the user's recent
calls first from via FTP or
All Users Recent Calls. Disabling does not
delete call history, but having an external snapshot is sometimes required for
compliance.
Untick Active, do not click Delete.
Deleting the user removes everything and is irreversible. The Active checkbox is the
reversible option.
Check who is currently logged into the Abilis
Goal: You want to know which users or devices are currently connected to the Abilis —
for example, to check if someone is using a shared account, or to verify that a VPN connection is active.
Where this lives in 9.1 is still being verified. Earlier drafts of this guide
pointed to Administration → System → General parameters, but that tab
(per admin-system.html) holds SMTP/SMS notification defaults, not session info. Until the
correct location is confirmed, useful nearby views include: