Goal: Connect an IP camera to the Abilis so it can record footage, show a live view in your browser and trigger alerts based on motion or a schedule.
How cameras connect: Unlike typical NVR systems where you enter an RTSP URL and credentials,
the Abilis discovers cameras through the Automation > Discovery system — the same way
WIO modules are found. The camera appears as an Rvs (Remote Video Surveillance) device.
Connect the camera to the same network as the Abilis.
Go to Automation > Discovery.
The camera should appear in the discovery table as an Rvs device with Status: Free.
Alarm holdoff (sec): cooldown time before a new alarm can trigger (default: SYS 600).
Max. LIVE recording (sec): maximum length of a manual LIVE recording (default: SYS 600).
Click Save when done.
There is no separate "recording schedule" page. Recording behaviour is controlled entirely
through these camera settings — the idle interval determines continuous recording, and the alarm
parameters control event-triggered recording.
View a live camera feed
Goal: Watch what a camera is seeing right now in real time, directly in your web browser — without installing any special software.
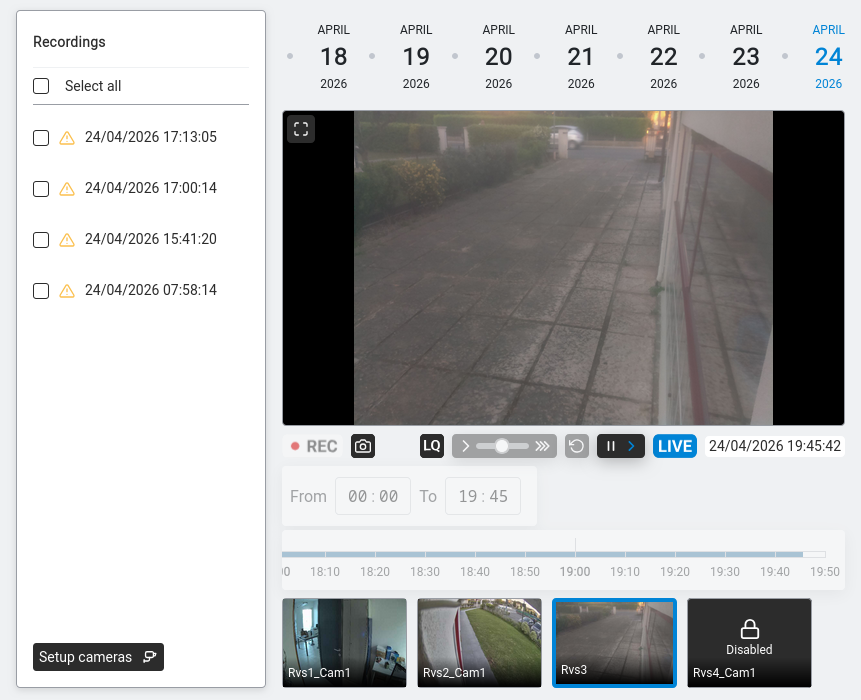
The video page. The main panel shows the selected camera's live feed. Below it: REC (recording indicator), camera icon (take snapshot), HD (quality toggle), playback controls and the LIVE badge. The timeline shows recordings for the selected day. Camera thumbnails at the bottom let you switch between cameras.
Go to Videorecorder.
Click on the camera thumbnail at the bottom of the page (e.g. "Rvs1_Cam1").
The live feed appears in the main video area.
Click the LIVE button in the player controls to ensure you're watching real-time video.
No username or password is needed — the Abilis handles the camera connection internally.
You access the video through the Abilis web interface, not directly from the camera.
Capture a snapshot from a live camera feed
Goal: You want a single still image from a camera — to include in an
incident report, attach to an email, send to insurance or police or just keep as
evidence — without exporting a whole video clip.
Click the camera icon (next to REC) to save a still frame from the current view.
Go to Videorecorder.
Click the thumbnail of the camera you want a snapshot of. The live feed opens in
the main viewer.
Look for a snapshot or camera icon on the player
controls (typically next to the play/pause controls).
Click it. The browser either downloads the image immediately, or opens it in a new
tab where you can right-click and Save image as…
For recurring snapshots — for example an image emailed every hour from
the entrance camera — see Start recording when an event fires
below; the same trigger mechanism can capture stills instead of video on some firmware
revisions.
The snapshot is taken at the camera's current live resolution, so for a
sharper image, first check the camera settings and make sure the resolution is set high
enough for the intended use. A 640×480 feed produces a low-resolution snapshot — fine for
context, too small for identifying a face or a number plate.
Pan, tilt and zoom a camera (PTZ control)
Goal: Your camera can move — it's a PTZ camera (Pan-Tilt-Zoom). You
want to reposition it from the browser to check a different angle, follow something
happening on-site or save preset positions to return to quickly.
PTZ — a camera with motors that let it rotate
horizontally (pan), tilt up and down and zoom optically. Controlled remotely instead
of physically repositioned. Fixed (non-PTZ) cameras do not show these controls.
Go to Videorecorder. Click the camera you want to control.
The live feed opens.
If the camera supports PTZ, a control pad appears alongside or below the feed:
Arrows — pan left/right, tilt up/down. Hold to move
continuously, release to stop.
+ / − — zoom in / zoom out.
Home — return to the default position.
If none of these appear, either the camera is not PTZ-capable or the Abilis has
not recognised it as one — check the camera's own datasheet and its configuration
at Add and configure an IP camera.
Move the camera to a useful position.
To save the position as a preset (so you can return to it with one click later),
look for a Save preset or + near the PTZ pad.
Give the preset a name (e.g. Front Gate, Loading Bay).
The preset list appears next to the pad. Clicking a preset name jogs the camera
straight to that position.
Useful presets for typical installations: Overview (zoomed out,
whole area), Entrance (tight on doors or gates), Parking. Combined with
event-triggered recording and
phone-call triggers, presets give you a
practical "zoom to the interesting thing automatically" setup — a phone call or a sensor
can jog the camera to a preset and start recording.
Jump a PTZ camera to a preset when an event fires
Goal: A PTZ camera is watching a wide area. When something happens —
a gate button is pressed, a panic button is hit, a sensor trips, a specific number
calls in — the camera should immediately jog to a saved preset position pointing at
the relevant spot: the gate, the reception desk, the loading bay. The camera
"follows the action" automatically, so the live view and the recording are framed
on what matters from the first frame.
Open the alarm / event rule that corresponds to the trigger.
Add an action to the rule pointing at the PTZ camera:
Target: the camera's device identifier.
Action:Go to preset.
Preset: the name or number of the preset you saved earlier
(e.g. Entrance, Loading Bay).
Chain a recording start. Add a second action on the same rule:
start recording on the same camera. Sequence
matters — the preset jog runs first (a fraction of a second), then recording
starts once the camera has moved; the saved footage begins with the camera already
on target.
Save the rule.
Test by triggering the source event. In the Videorecorder live view, the camera
should visibly move to the preset within a second. The recording for that camera
will be marked as alarm-triggered and show the incident from the correct angle.
For a camera covering a large area (car park, warehouse), save three or
four presets — one per zone — and bind each to a different trigger. The camera becomes
a smart pan-tilt sentry that always looks at the zone where something is happening,
rather than a fixed lens missing the action.
PTZ presets rely on the camera's mechanical position feedback being
accurate. A camera that drifts (after power cuts, vibration or long use) can jog to the
wrong place. If presets start to look misaligned, recalibrate the camera via its own web
interface and save the presets again; the Abilis references them by name, so nothing on
the rule side needs to change.
Watch several cameras on one screen
Goal: A single-camera view is fine if you only have one camera or
you're investigating one incident. For situational awareness — a reception desk
keeping an eye on entrance + loading bay + car park simultaneously, a security guard
monitoring all zones at once — you want several cameras visible on the same screen.
Go to Videorecorder.
Look for a multi-view or grid button in the
controls (often an icon showing four squares).
Choose a layout — common options are 2×2 (four cameras), 3×3 (nine) or an
asymmetric layout with one large camera plus thumbnails.
Drag cameras from the list into each cell of the grid, or click an empty cell and
pick a camera from a dropdown. You can assign the same camera twice if you want
it in two places.
Save the layout with a descriptive name — Reception-entrance,
Night-security, All-cameras — so you can switch between
presets quickly.
Multi-view uses more CPU and bandwidth than a single feed — the Abilis
has to decode every camera in the grid simultaneously. If the display gets stuttery when
you add more cells, lower the resolution or frame rate on the individual cameras via
Set camera resolution and frame rate, or reduce the grid
size.
A multi-view tile is for live monitoring only — click a tile to go
into single-camera mode when you need to review recordings or use PTZ controls for that
camera.
Play back recorded footage
Goal: Go back and watch footage that was recorded earlier — for example, to see what happened at the front door last night or to review an incident.
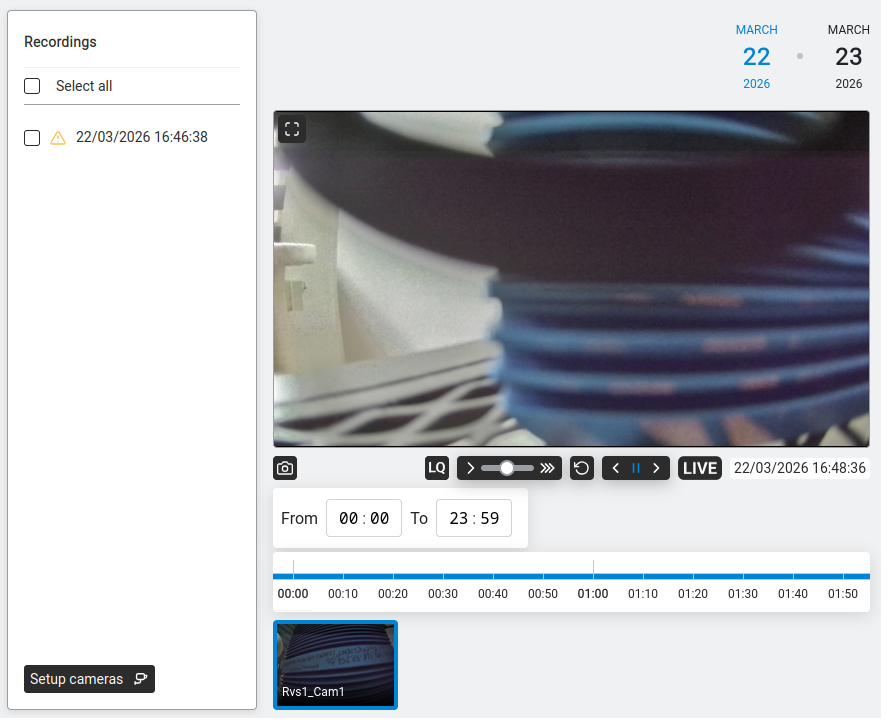
Videorecorder — recorded footage playback with recordings list, timeline and camera selector.
Go to Videorecorder.
Use the date selector (top right) to pick a day. Dates with recordings are highlighted in blue.
The Recordings panel (left side) shows all recordings for that day with timestamps.
A warning triangle (⚠) indicates an alarm-triggered recording.
Click a recording to play it in the video area.
Player controls:
— take a snapshot of the current frame.
HD — toggle between the preview (low-bandwidth) and full-resolution stream.
Speed slider — playback speed (slow to fast).
↻ — refresh.
◁ ‖ ▷ — previous frame, pause, next frame.
LIVE — switch to the live feed.
The timeline bar at the bottom shows the day's activity. Use From and To fields
to narrow the time range (e.g. 08:00 to 18:00 for business hours only).
Configure recording behaviour
Goal: Control when and how your cameras record — continuously in the background, only when motion
is detected or a combination of both. This lets you save disk space while still capturing the moments
that matter.
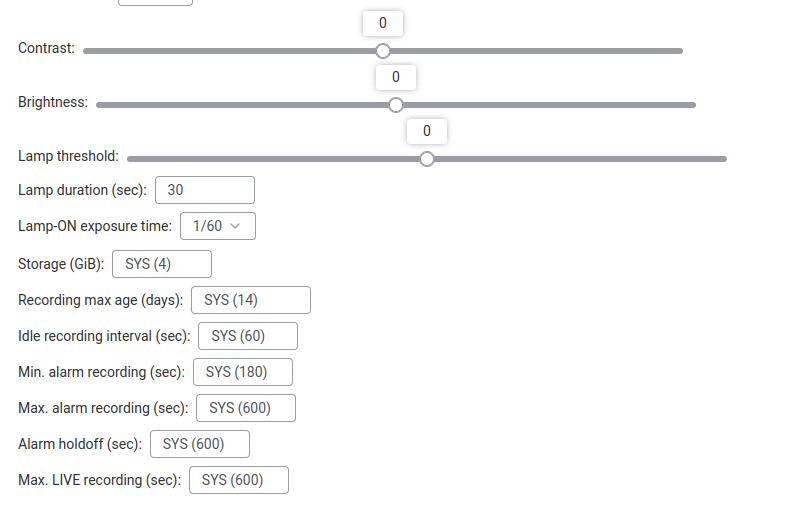
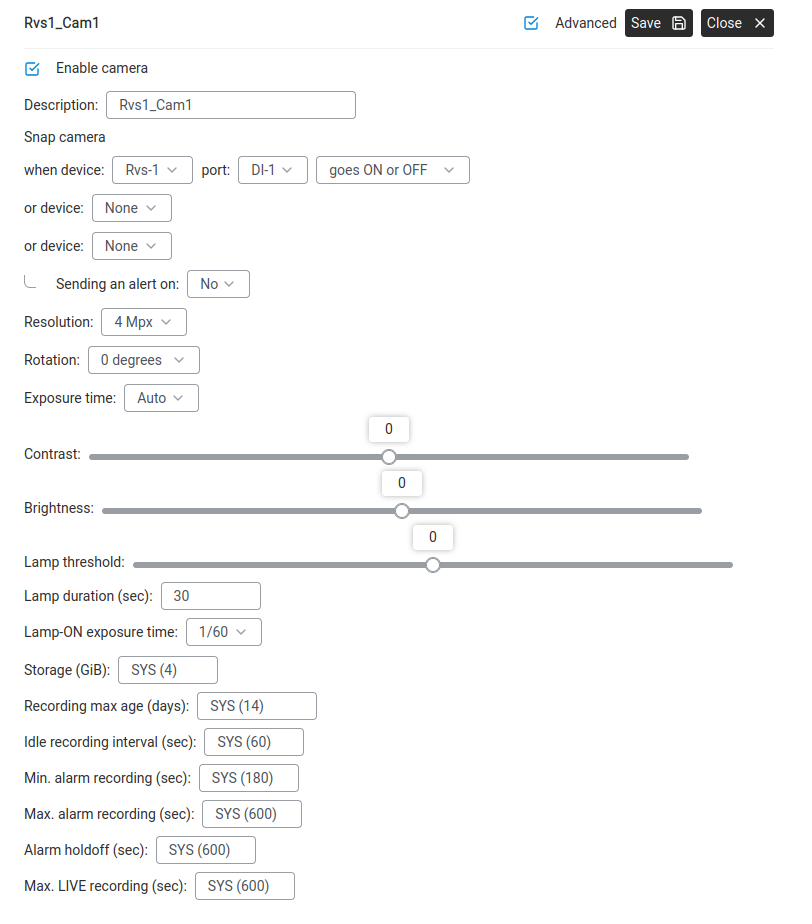
Camera settings with Advanced enabled — all recording parameters visible.
Go to Videorecorder → Overview. Click on the camera you want to configure.
Tick Advanced to reveal all recording settings.
Set continuous (idle) recording. The Idle recording interval controls how often a frame
is captured when nothing is happening. The default is SYS (60) = one snapshot every 60 seconds.
Set it to 0 to disable continuous recording entirely (the camera will only record during alarms).
Set alarm recording. When a trigger fires (motion detected, a digital input changes),
the camera switches to full-speed recording:
Setting
What it controls
Min. alarm recording
Minimum recording time after a trigger — even if the motion stops immediately, the camera keeps recording for at least this many seconds.
Max. alarm recording
Maximum recording time — the camera stops even if motion continues, to prevent filling the disk from one long event.
Alarm holdoff
Cooldown period — after an alarm recording ends, the camera waits this many seconds before a new alarm can start. Prevents rapid re-triggering from a swinging door or flickering light.
Click Save.
Tip: A good starting configuration for a security camera is: idle recording at 60 seconds (so you always have a timeline), alarm recording 10–60 seconds, holdoff 5 seconds. Adjust based on how busy the area is — a warehouse entrance needs longer alarm recording than a quiet hallway.
Configure motion-detection zones on a camera
Goal: A camera's own motion detection is triggering on the wrong
things — trees waving in the wind, traffic on a road, a flag on a pole, a shadow
moving across the ground as the sun sets. You want the camera to watch motion only
in specific parts of its field of view (the gate, the walkway, the doorway) and
ignore everything else. This cuts false alarms, reduces storage waste from
useless alarm recordings and makes every triggered recording meaningful.
Motion zones — user-defined regions in the camera's
view where motion detection is active. Anything moving inside a zone triggers; motion
outside the zones is ignored, even if it's more intense.
Go to Videorecorder and click on the camera whose zones
you want to configure. The live feed opens in the main viewer.
Open the camera's Motion Detection settings. Some cameras expose
zone configuration directly through the Abilis web interface; others require
logging into the camera's own web interface. Check the camera's documentation if
the setting isn't visible in the Abilis view.
Draw the zones. The interface is usually a grid overlaid on the live image — tick
cells that should be sensitive, leave others inactive. Alternatively, some
interfaces let you drag rectangles on the image.
Draw around the gate, the doorway or the path people actually walk on.
Leave out the road, the treeline, the sky and any reflective surfaces.
For a parking lot, zone the parking bays but exclude the access road outside
your property.
Set sensitivity per zone (if supported). A doorway doesn't need high sensitivity
— any person-sized motion triggers. A distant gate may need higher sensitivity to
catch someone walking up.
Save. Test by walking through each zone and seeing the camera trip into alarm
recording. Then walk through excluded areas (e.g. the road beyond the fence) and
confirm it doesn't trip.
Tune over a day. If false alarms still happen, check the Videorecorder alarm log —
often one specific zone is catching a shadow at a certain time of day. Adjust or
remove that zone. One week of tuning usually resolves 90% of false alarms.
Motion zones work best when combined with
recording schedule settings (idle vs alarm recording) and
event-triggered recording from other
sources. Zones eliminate nuisance triggers from this camera; the other tools
ensure that real events from other sources (a door contact, a panic button)
still start camera recording regardless of motion.
Motion detection is not the only way to trigger recording — some
installations turn motion detection off entirely and rely on external events (sensors,
digital inputs, CTI rules) to start recording. That approach gives zero false alarms but
requires event-generating sensors at every location of interest. For most small
installations, well-tuned motion zones are a good balance of coverage and simplicity.
Start recording when an automation event fires
Goal: You want the cameras to switch to full-speed recording in
response to an event somewhere else on the Abilis — a panic button pressed, a door
contact opening after hours, a water leak sensor triggering, a specific phone call
coming in. Not just motion detected by the camera itself, but any event the
Abilis knows about.
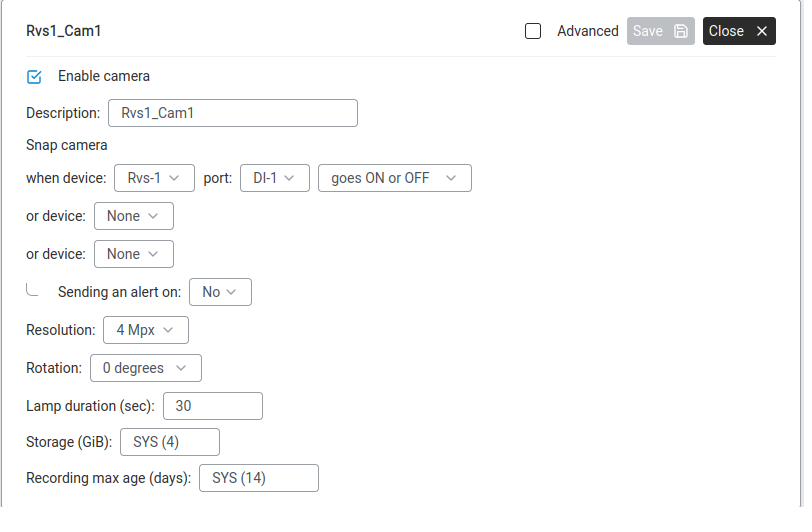
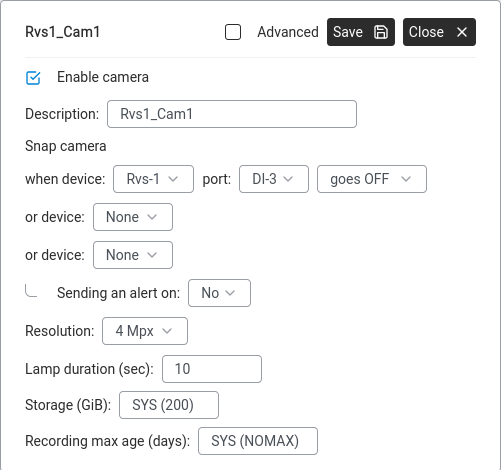
The Snap camera section. Set the device, port and trigger condition (goes ON, OFF or ON or OFF). When the event fires, the camera starts recording automatically.
How it works: the Configure recording behaviour
section sets up alarm recording based on the camera's own motion trigger.
To start recording from an external event, you link the automation alarm to
the camera via the ALARM resource — the same place you'd wire the event to call a
phone or send an SMS.
Confirm the camera is working and saving recordings as expected — see
Add and configure an IP camera and
Configure recording behaviour. Set the idle recording
interval low or to 0 so the "interesting" recordings stand out in the timeline.
Set up the source event — the digital input, threshold or phone call. Examples:
In the alarm rule (step 3 of the referenced how-to), under
Action, add an entry that targets the camera — typically a
start camera recording action pointing at the Rvs (Remote Video
Surveillance) device and the specific camera number.
Optionally chain a PTZ preset call: add a second action that tells a PTZ camera
to jump to a saved preset (e.g. Entrance) before recording starts, so the
camera is pointing at the right thing from the first frame.
Save the alarm rule.
Test — trigger the source event. In Videorecorder for that
day, you should see an alarm-marked recording (with a warning triangle) appearing
at the trigger time.
This is how the "panic button starts all cameras" scenario is actually
built — one alarm rule, with several recording-start actions each pointing at a different
camera. Every camera captures the event from its own angle, and you end up with a complete
multi-angle record of what happened.
Set camera resolution and frame rate
Goal: Balance image quality against bandwidth and disk usage. Higher
resolution and frame rate give sharper video and smoother motion, but they also mean
the recordings fill the disk faster and consume more CPU. You want settings that are
high enough to identify faces and number plates when something matters, without
burning storage on quiet hours.
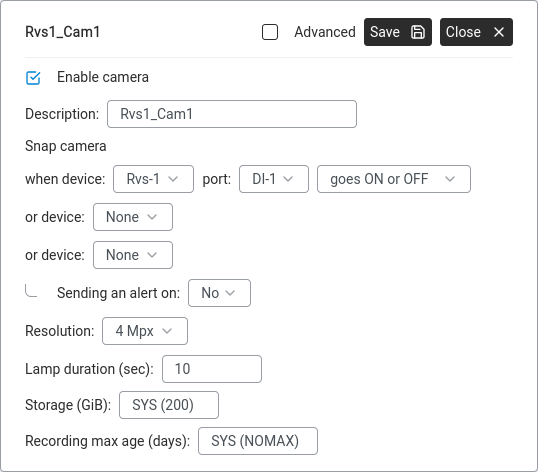
Camera settings dialog. Set the Resolution (here 4 Mpx), Storage allocation and Recording max age. Tick Advanced for more options (frame rate, idle recording interval, lamp settings).
Go to Videorecorder and click on the camera you want to
configure. Its settings panel opens.
Tick Advanced (if present) to expose quality controls.
Find and set the camera's quality parameters. Typical fields:
Resolution: choose from the list the camera supports —
640×480 (low, small files), 1280×720 (HD, good
balance), 1920×1080 (Full HD, sharp but large),
2560×1920 or higher if the camera is 5-megapixel+.
Frame rate: frames per second recorded during alarm.
5 fps is sufficient for most surveillance; 15–25 fps
is smooth motion for live monitoring; 30 fps is real-time video
— rarely needed for security and very expensive in storage.
Bit rate / quality: some cameras expose this as a compression
quality slider or a target bits-per-second. Higher bit rate = less compression
artefact = larger files.
Click Save. Some cameras apply immediately; others need a restart
of the video stream (re-open the live view).
Observe the live feed to confirm the picture is good, then check
disk usage the next day — if the partition is
filling faster than expected, step down one resolution or reduce the frame rate.
Practical starting point for most installations: HD (1280×720), 10 fps
alarm recording, idle recording 1 frame per minute. For an entrance or till where face
identification matters, step to Full HD (1920×1080) on that camera only. Higher settings
everywhere rarely pay back.
Some of these fields are controlled by the camera itself, not by the
Abilis — in which case the Abilis settings just reflect what the camera is doing. If the
values you set don't seem to apply, log into the camera's own web interface to change
them there.
Manage recording storage
Goal: Check how much recording space is left, free space by removing
storage you no longer need and run a file system check when recordings look corrupted.
The Videorecorder has its own storage page: open Setup Cameras → Storage
Management from the Recordings panel. It shows the recording disks, how full each is
and the per-camera storage allocations.
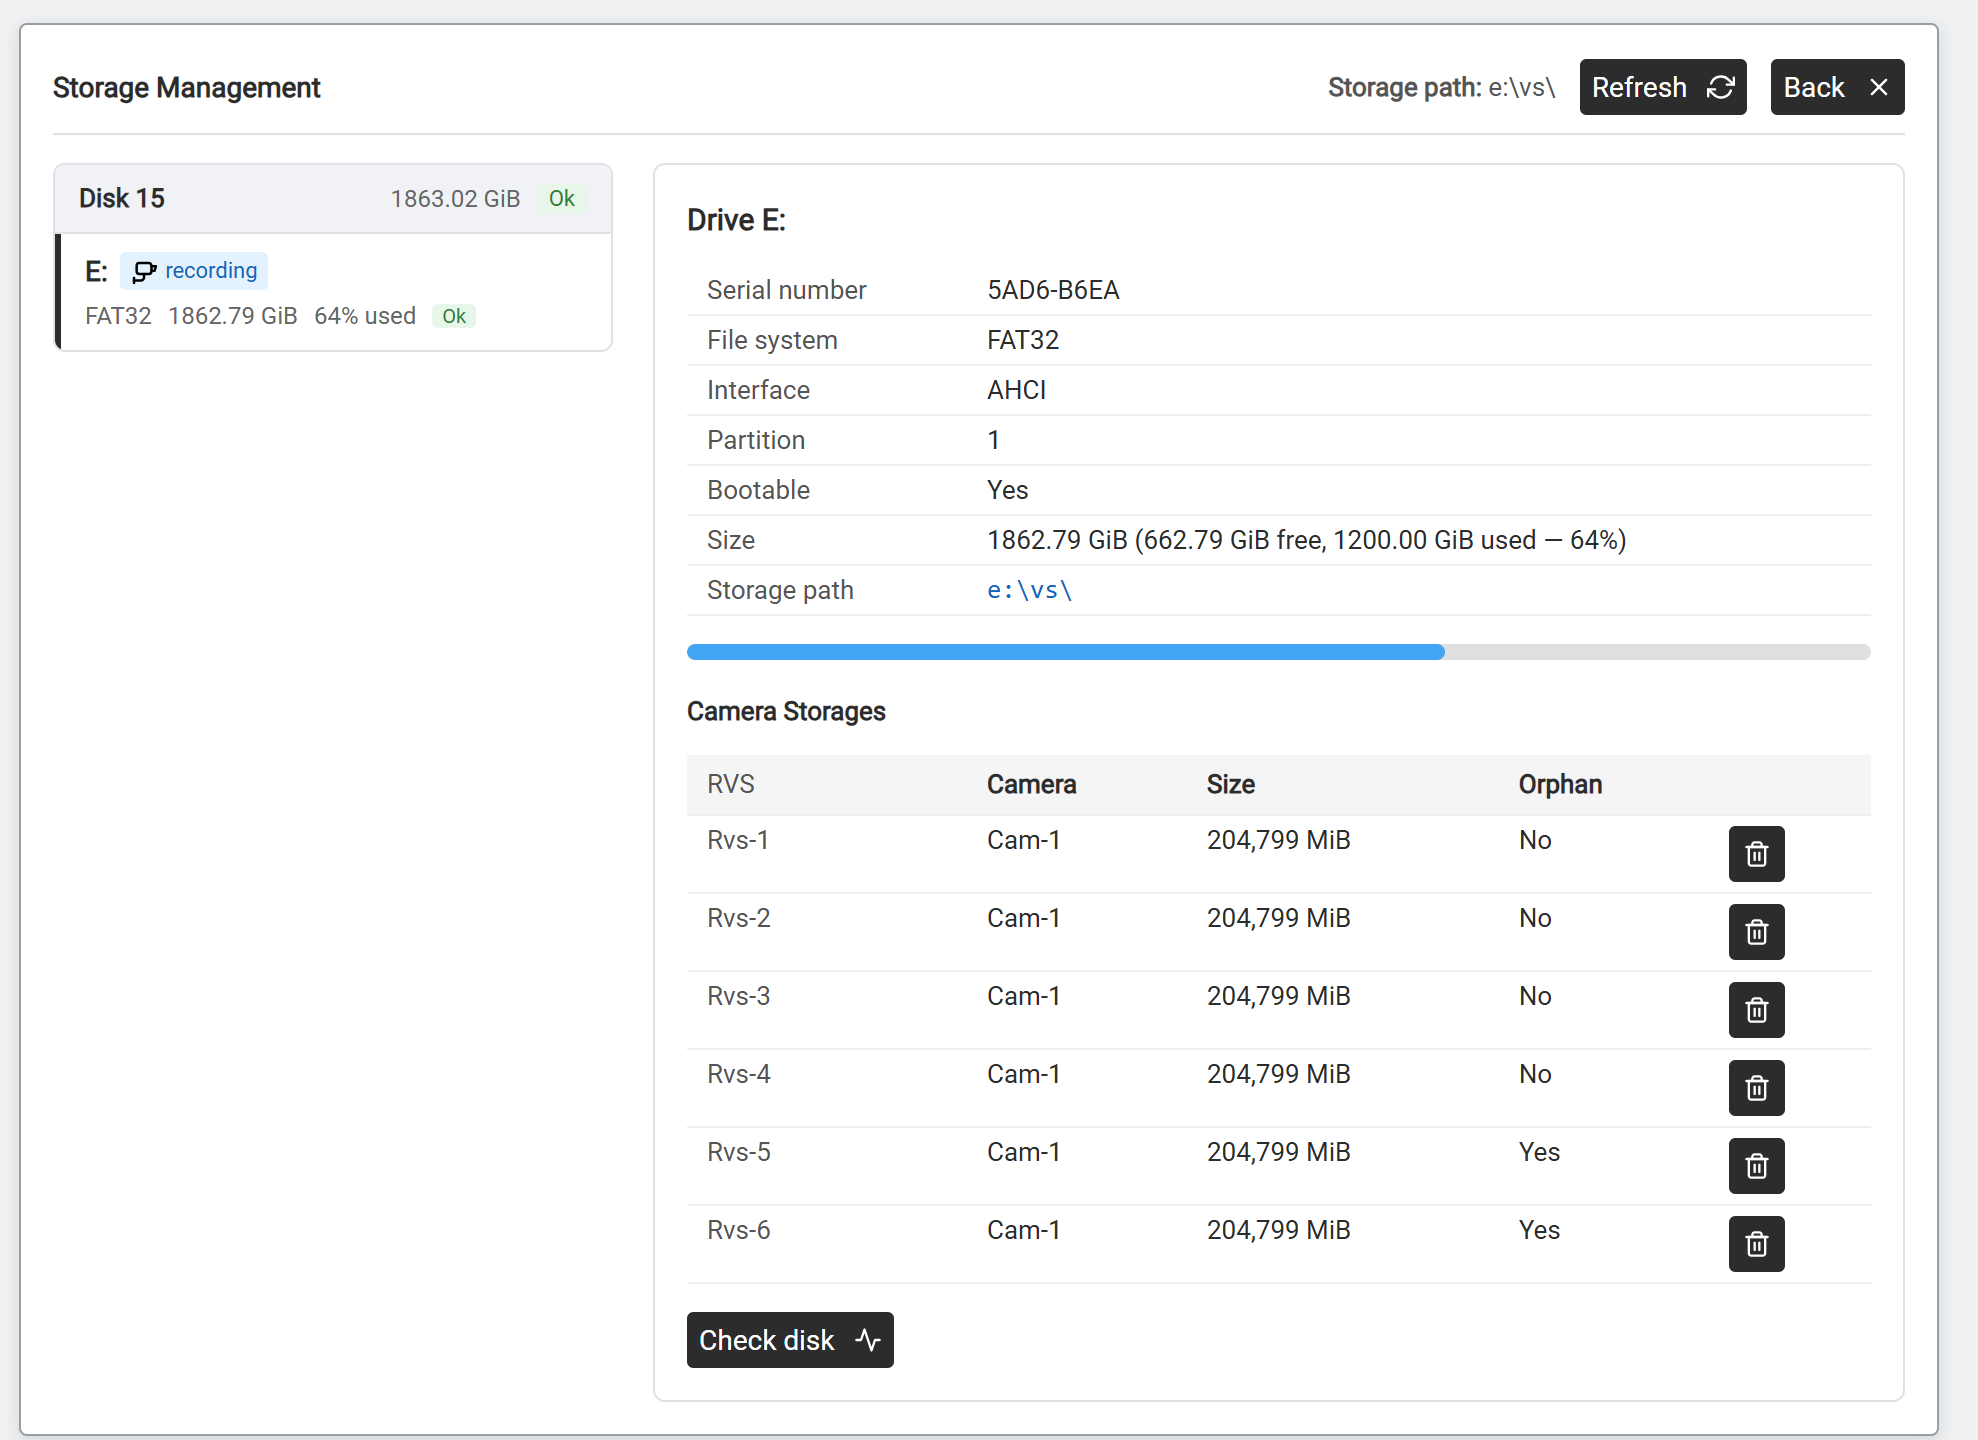
Storage Management. Left: the recording disks with usage and state. Right: drive detail (file system, size, free / used) and the Camera Storages table.
Pick a disk. The left rail lists each recording disk with its size, used
percentage and state. Click one to see its detail on the right: serial number, file system
(the recorder uses FAT32),
interface, size, free / used space and the storage path (e.g. e:\vs\).
Review the Camera Storages table. Each row is one camera's storage allocation:
The video resource the allocation belongs to (Rvs-1, Rvs-2…).
Camera
The camera bound to that resource.
Size
Disk space the allocation occupies.
Orphan
Yes means the allocation is no longer attached to a live camera — footage left behind after a camera was removed or reconfigured. Safe to delete to reclaim space.
Use the trash icon on a row to delete that allocation.
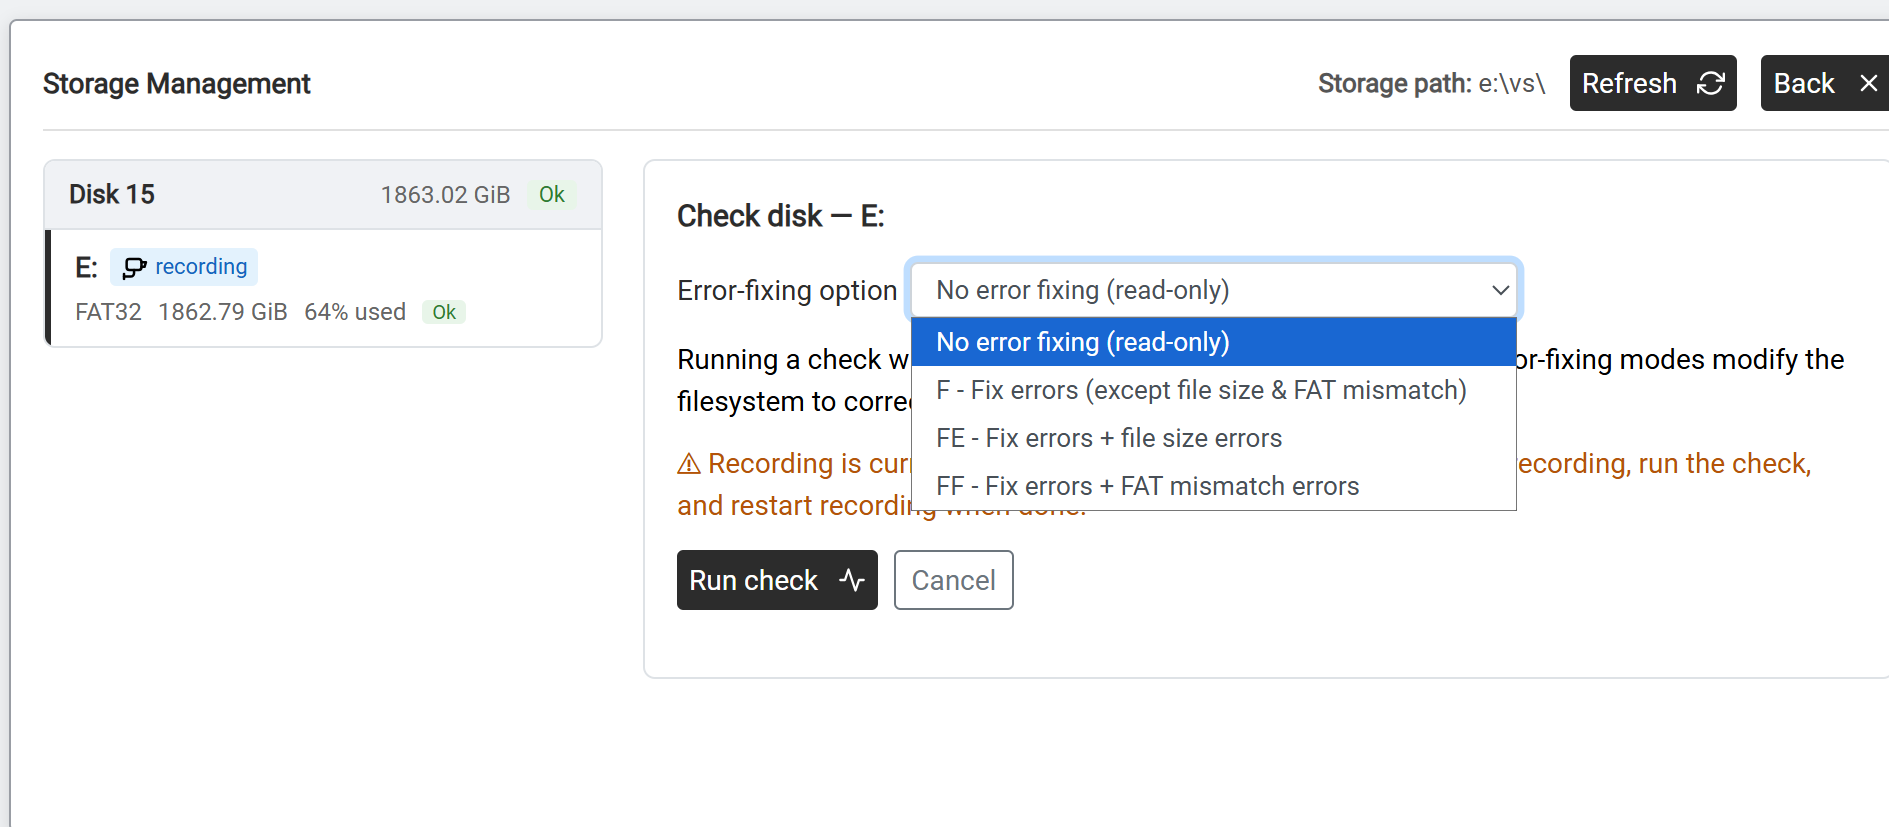
Run a disk check if recordings look corrupted. Click Check disk.
Pick an error-fixing option:
Option
What it does
No error fixing (read-only)
Inspects the file system and reports problems without changing anything. Safe to run any time.
F
Fixes errors, except file-size and FAT mismatches.
FE
F, plus fixes file-size errors.
FF
F, plus fixes FAT mismatch errors.
Then click Run check.
Recording must be stopped while a fixing check runs. Stop recording, run the
check, then restart recording when it finishes.
Check disk on drive E: the Error-fixing option dropdown — read-only inspection, or F / FE / FF to fix progressively more error types. Run check starts it.
Per-camera limits
How much each camera is allowed to store is set on the camera itself
(Videorecorder → click the camera → tick Advanced):
Recordings older than this are deleted, even if the disk isn't full yet.
SYS (14) = 14 days
If you need more history, raise the max age. If the disk is running low, reduce the storage per
camera, reduce the max age or delete orphan allocations on the Storage Management page.
Tip: The total of all cameras' Storage (GiB) values should not
exceed the physical disk space. Storage Management shows the running total per disk.
A camera recording continuously at high resolution uses roughly 1–2 GiB per day.
Download a video recording to your computer
Goal: You need to save a specific video clip from your cameras — for example, to share with the police
after a break-in, to send to your insurance company or simply to keep a copy on your computer before the recording
is automatically overwritten when storage fills up.
Find the footage first. Follow the steps in Play back recorded footage to navigate to the date, time and camera you're interested in. Make sure you can see the clip in the player.
Look for the download or export button. On the playback page, look for a Download, Export or save icon (usually a downward arrow) near the video player controls.
Select the time range. If prompted, set the start and end time for the clip you want to download. Keep the clip as short as possible — video files are large (a 10-minute clip can be several hundred megabytes).
Download. Click the download button. Your browser saves the file to its Downloads folder. The exact format the Abilis produces depends on firmware — the Videorecorder stores footage as a sequence of JPEG frames (one frame every Idle recording interval seconds), so the export is either a packaged frame sequence or a server-side-generated video clip. Open the file with your operating system's default player to verify.
Tip: If you need footage with a visible timestamp (for legal or insurance purposes), check that the camera's own timestamp overlay is enabled — this burns the date and time directly into the video image so it's visible in any player, not just the Abilis interface.
Camera feed is offline or stuck — what to check
Goal: A camera that was working is now showing a red status, a frozen
frame or nothing at all. Before opening a support ticket, there are a handful of
things that fix almost every case.
Check the camera status in the Abilis. Go to
Videorecorder. The camera thumbnail normally shows a
status indicator:
Green — connected and sending frames. The problem is elsewhere (browser,
network path to your computer, not the Abilis).
Grey — inactive; the Abilis isn't trying to reach the camera.
Red — the Abilis is trying but not getting through.
Reach the camera on the network. Go to
Networking > Info > LAN Connections > ARP Monitor
and look for the camera's MAC address in the list. If the camera does not appear,
the Abilis cannot see it at all on the network — the issue is physical: power,
cable, switch port.
Check power over Ethernet. If the camera is PoE-powered, the switch
port (or PoE injector) might have lost power. Unplug and replug the network cable
at the switch end; if the camera has a status LED, it should come back on.
Reboot the camera. If the camera is reachable but not streaming
(it answers ARP but no video), reboot it. Either cycle the PoE at the switch, or
if the camera has a web interface of its own, use its reboot button.
Rediscover on the Abilis side. Go to
Automation > Discovery and force a rediscovery. The
camera should reappear with status Bound — see
Discover and connect a WIO module which
uses the same discovery system.
If the camera works but its recordings are missing, check
Setup Cameras > Storage Management. If the camera's row
shows Orphan = Yes, its old storage allocation is no longer attached to the
live camera — delete that allocation and let the camera rebuild it. See
Manage recording storage.
If the feed is connecting but distorted or stuttering, the issue is
usually bandwidth. Check the CPU load under
Monitor CPU load — sustained high CPU means the
Abilis is struggling to process the stream. Lower the camera's resolution or frame
rate in the camera settings.
Still not working — collect the camera's IP address, MAC address,
model and the exact error message (or screenshot) from the Videorecorder page, and
contact Anteklab support. These details let them
diagnose in one round-trip instead of ten.
Intermittent camera drop-outs (green-to-red-to-green every few minutes)
are almost always a network or PoE issue rather than an Abilis or camera problem. Check
for loose cabling, a switch port with a failing power budget or wireless range problems
if the camera is on Wi-Fi.
Anteklab Technical Support
Email: tem@antek.it
Tel: +39 0376 16262,27