Goal: Connect a SIP phone (a desk phone or a softphone app on your computer) to the Abilis so it can make and receive calls through the Abilis phone system.
SIP registration — phones register with the Abilis PBX to make internal and external calls.
Prerequisites: a user account on the Abilis with SIP enabled.
The SIP username and password are set at Administration > Users Management > [user] > SIP
(separate from the user's web-login password).
SIP server / registrar: both phone-side fields take the same value — the Abilis IP address (e.g. 192.168.1.1). The two terms are usually co-located on a PBX; on the Abilis they're one address.
The phone should register automatically. Check at Phone > Extensions.
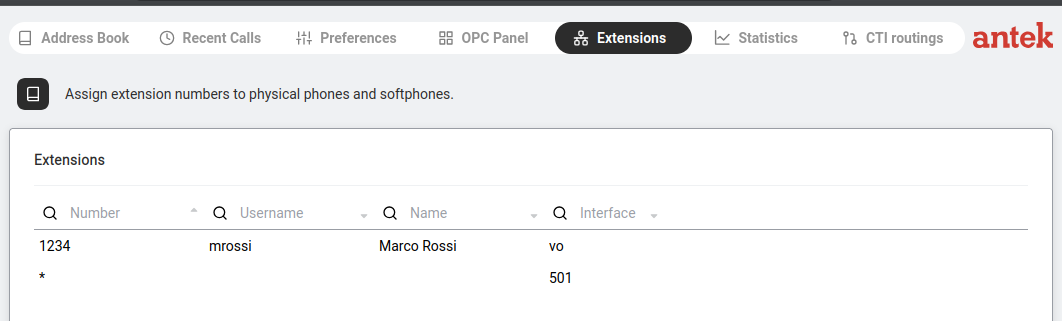
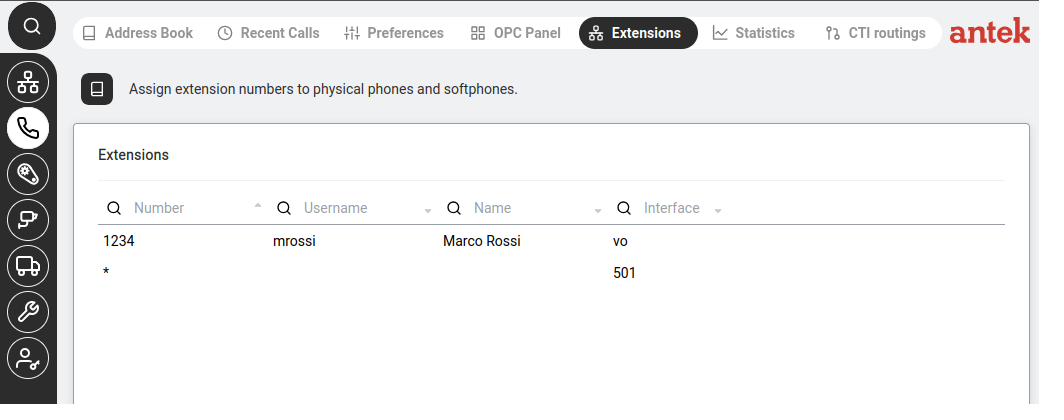
Extensions — registered phones appear with Number, Username, Name and Interface.
Each registered phone shows: Number (extension), Username, Name and Interface
(e.g. vo for VoIP).
Asterisk meanings in the Extensions table.* followed by a port number = a SIP trunk connection.
* alone in the Number column with no Username = the wildcard catch-all entry (different concept — see
Extensions reference).
Use your office extension on a mobile phone (Abilisphone)
Goal: Your desk extension should follow you when you leave the office
— the same number, the same caller-ID to the outside world, the same dial-plan. From a
client's point of view they are calling your office phone; you happen to be picking up
on a mobile. This is what the Abilisphone mobile app does.
Abilisphone / Virtual Office — the Abilis's mobile
softphone. It registers as an extension using the company internet connection (or
the phone's mobile data), so the mobile acts as the office phone.
Prerequisite: Virtual Office must be enabled on the Abilis. An
administrator configures system-wide defaults once — see
Administration → Virtual Office. After
that, adding a user to the mobile app is quick.
The user needs an Abilis user account. If they don't have one yet, create it via
Create a new user account and assign an
extension number.
On the user's profile (Administration > Users Management
→ click the user), enable the Virtual Office /
Abilisphone option so this user is allowed to use the app.
Click Save.
On the user's mobile:
Install the Abilisphone app from Google Play or the App Store.
Open the app and enter the server details:
Server: the Abilis's address as the mobile will reach it.
From outside the office, this is the WAN IP or (better) a
DDNS
hostname so the address survives WAN-IP changes. From inside the office over
Wi-Fi, the LAN IP also works.
Username: the Abilis user's username;
Password: the Abilis user's password.
The phone registers with the Abilis. After a few seconds the app should show
as Connected and be ready to place and receive calls.
Test. Dial the user's office extension from another office phone — the mobile
should ring. Dial an outside number from the mobile — it should use the office
trunk (the external caller sees the office number as caller ID).
Because the mobile extension and the desk extension share the same
number, both phones ring simultaneously on incoming calls by default — the first
one to answer takes the call. If you want the desk phone to ring first and the mobile
only after a few seconds, configure that in Call forwarding
and Do Not Disturb using the On no answer after X seconds option (rings the
desk first; forwards to the mobile after the timeout).
Goal: You have a traditional analog desk phone, a cordless phone or an
office FAX machine that you want to plug directly into the Abilis so it can make and
receive calls through the PBX just like a SIP phone.
POTS (Plain Old Telephone Service) — the original analog telephone
standard. An Abilis POTS card provides FXS ports: each FXS port supplies dial-tone
and ring voltage just like the wall jack in your house — the analog phone or fax thinks it's plugged into a real phone line.
Hardware requirement: a POTS card (e.g. POTS 4 / 8 / 16) must be installed
in the Abilis and connected to the internal power supply. Without a POTS card, the
FXS ports are not available — check Phone > Extensions; if no
POTS ports appear, the card is missing.
Plug the analog phone (or FAX) into one of the POTS port sockets on the rear of the
Abilis using a standard RJ-11 phone cable.
Go to Phone > Extensions.
Locate the row for the POTS port the phone is plugged into — it appears with an
interface like ctip:101, ctip:102 and so on (one entry per
physical socket on the POTS card). The lowercase ctip: prefix here is the literal GUI value;
uppercase CTIP is the tab name on Phone → Preferences — same concept.
Click on that row and set:
Number: the internal extension you want this phone to answer as
(e.g. 21 for a technician, 35 for a FAX).
Description: something clear like Technician 1 or
Office FAX.
Test — lift the handset on the analog phone; you should hear the Abilis dial tone.
Dial another extension to confirm internal calling works.
Advanced: CLI equivalent
The CLI command sequence for this task is documented in
Chapter 85.2 — How to configure FXS (POTS) ports of the old Abilis manual.
A rewritten CLI guide is in preparation; this link will be updated when it is ready.
Add a contact to the Address Book
Goal: Save a phone number with a name in the Abilis address book so you and your colleagues can quickly look up contacts without remembering numbers.
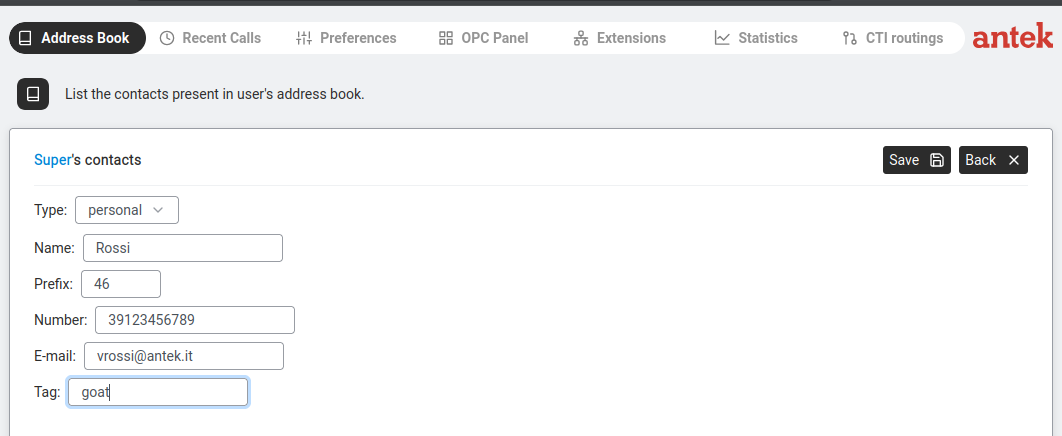
Address Book — new contact form with Type, Name, Prefix, Number, E-mail, Tag.
Go to Phone > Address Book.
Click New +.
Fill in:
Type: personal (your private contacts) or public (shared with all users).
Name: the contact name (e.g. "Rossi"). Note: public contact names cannot contain spaces.
Prefix: a short dial prefix if needed (e.g. "46").
Number: digits only (no + or spaces — same rule as the Address Book Number field). Use the international format as digits, e.g. 39123456789 for +39 02 1234567.
E-mail: optional.
Tag: a label to organise contacts (e.g. "supplier", "customer").
Click Save.
Set up call forwarding and Do Not Disturb
Goal: Redirect your incoming calls to another number (e.g. your mobile) when you are away from your desk, or activate Do Not Disturb so your phone does not ring at all.
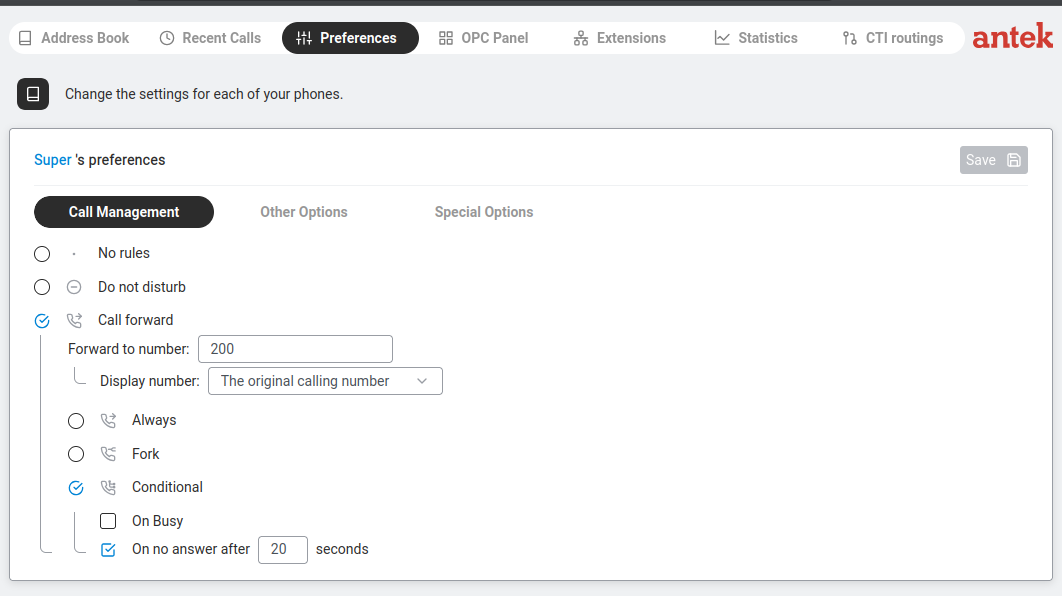
Call forwarding — incoming calls are redirected to your mobile instead of ringing your desk phone.Preferences > Call Management — forwarding and DND options.
Go to Phone > Preferences.
On the Call Management tab, choose one of:
No rules — phone rings normally, no forwarding.
Do not disturb — callers hear a busy tone. Your phone doesn't ring.
Call forward — redirects calls. When selected, additional options appear:
Forward to number: the destination (e.g. 200 for voicemail, or a mobile number).
Display number: what the destination sees — "The original calling number" (recommended)
or a fixed number.
Always — every call goes directly to the forward number. Your phone never rings.
Fork — splits the incoming call so both your phone AND the forward number ring simultaneously. First to pick up takes the call. (The name comes from telecom signalling — think of the call branching into two ringing destinations.)
Conditional — forward only in specific situations:
On Busy — forward only if you're already on a call.
On no answer after X seconds — your phone rings first, then forwards after the timeout (e.g. 20 seconds).
On all other causes — anything not covered by Always / On busy / On no answer (typically: phone unregistered, network unreachable, error states).
Click Save.
Route calls differently outside business hours (night mode)
Goal: During office hours, calls ring the reception extension. Outside
office hours, they go straight to an after-hours voicemail greeting or an on-call
mobile. Weekends and holidays should be treated as "outside hours". No-one has to
manually flip a switch each evening.
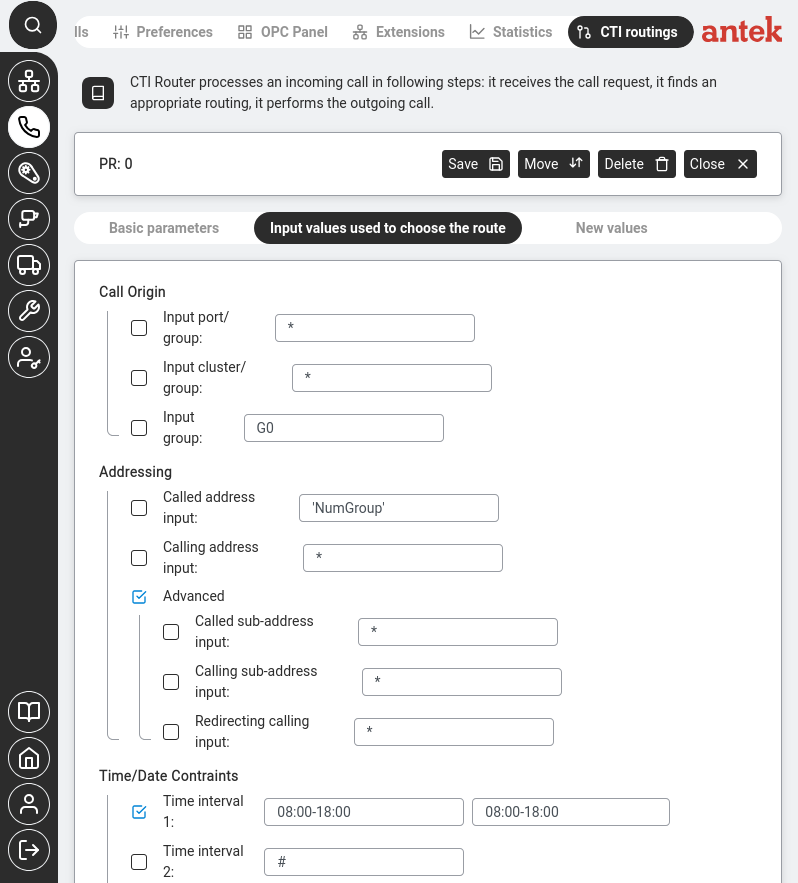
Phone > CTI routings > Input values tab. The Time/Date Constraints section at the bottom sets when this routing rule is active (here: 08:00–18:00). Create a second rule without the time constraint for night/weekend calls.
The routing is done in Phone > CTI Routings using
time windows attached to each rule. You have two rules for the same
inbound number: one active during business hours, one active the rest of the time.
Output: the after-hours destination — a DISA service playing the greeting, a
mobile number or voicemail.
No time condition, or a complementary window.
The idea is that during business hours the first rule wins; outside, it doesn't
match and the fallback rule handles the call.
Save.
Test by calling in from outside during both windows — a colleague's mobile is a
quick way — and confirming the right behaviour.
For holidays, the simplest approach is a third rule with a
date-specific window (e.g. 24–26 December) and the highest priority. On those
dates it takes precedence over the normal business-hours rule. After each holiday, either
delete it or keep a small library of named holiday rules you enable/disable as needed.
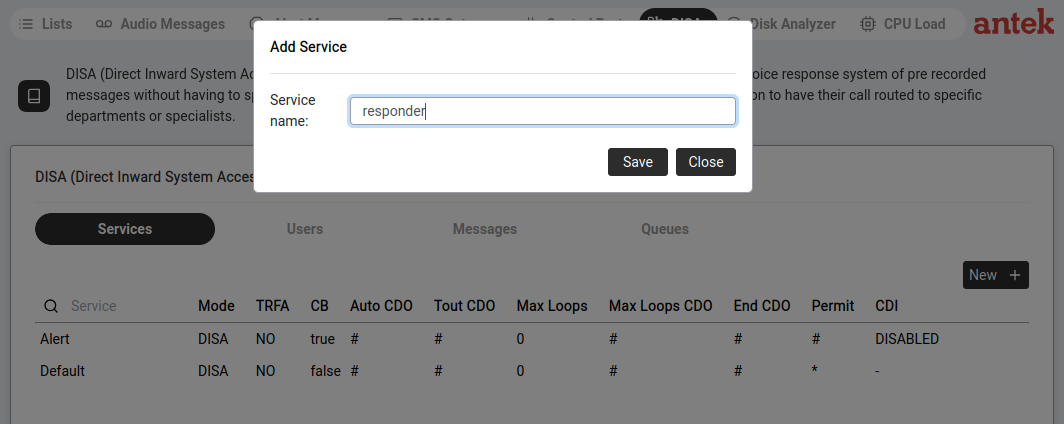
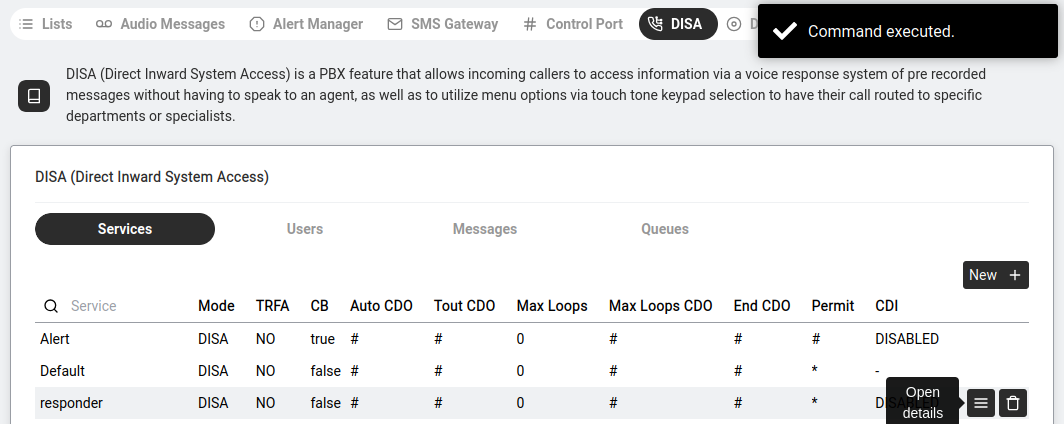
Set up an auto-attendant / voice menu (DISA responder)
Goal: Set up an automated voice menu that answers incoming calls and lets callers choose where to go — for example: "Press 1 for Sales, Press 2 for Support."
DISA call flow — the caller hears a menu and is routed to the right person or department.
DISA (Direct Inward System Access) — the Abilis feature that plays pre-recorded
messages and routes callers based on keypad input.
Incoming Called number used for pre-identification. Set to # to use the calling number instead.
Step 2: Create CTI routing rules to connect calls to the DISA
The DISA service alone doesn't receive calls — you need CTI routing rules that direct
incoming calls to the DISA service, and rules for each keypad digit that route to the right extension or group.
To send incoming calls to your DISA service, add a CTI routing rule with the
DISA service name as the Exit port. See the
worked examples on the CTI Routings page for the rule structure
— you'll want a pattern similar to Example 1, but with the DISA service as the
destination instead of PBX.
The complete CTI-to-DISA chain involves multiple rules: one inbound rule
to send calls to the DISA service, plus one rule for each menu option (Press 1 / Press 2 / etc.)
that routes to the right extension or group. Once the rules are in place, you can manage
the audio messages yourself (see Record Audio).
Configure a call queue with music on hold
Goal: When a customer calls your office and all employees are busy on other calls, you don't
want the caller to hear a busy tone and hang up. Instead, they should hear music (or a message
like "Please hold, an operator will be with you shortly"), wait in line and get connected
automatically as soon as someone is free.
Call queue — callers wait with music on hold until an agent is free.
How it works: A call queue is attached to a DISA service. When a call comes in, the DISA
responder checks if any agent is available. If yes, it rings that agent. If all agents are
busy, the caller enters the queue and hears music on hold.
In Abilis queue terminology, an agent = an extension assigned to handle
the queue's calls. The phone, not the person — the same extension can be answered by
whoever is sitting at it.
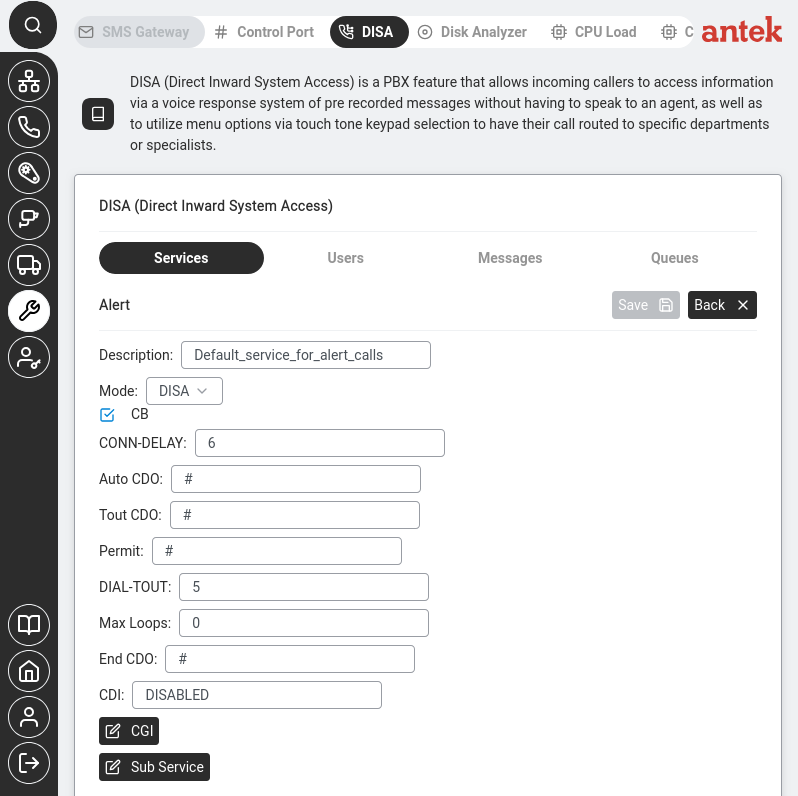
Go to Tools → DISA → Queues tab. This shows all configured queues and their current status (how many callers are waiting, how many agents are available).
Configure queue settings for your DISA service. Open your DISA service from Tools > DISA, click into the service to view its detail and switch to the queue-settings sub-tab. Each DISA service can have queue parameters:
Setting
What it controls
Agents
Which phone extensions are part of this queue. When a call comes in, these phones ring.
Max wait time
How long a caller waits before being sent to an overflow destination (e.g. voicemail).
Overflow destination
Where the call goes if nobody answers within the max wait time — typically voicemail or another queue.
Set up music on hold. Go to Tools → Audio Messages. In the Music on Hold row, select or upload the audio file you want callers to hear while waiting. See Upload an audio file if you need to add your own music.
Announce the caller's position and estimated wait. On the queue's
settings, enable Position announcements. The Abilis periodically plays
a message to waiting callers — typically "Your call is important to us, you are
number 3 in the queue" — so people don't think they've been forgotten. If you have
the estimated-wait option available, tick it too: the message then includes an
approximate wait time based on the queue's recent average handling time.
Record (or upload) the position-announcement voice track. The
announcement uses an Abilis audio message as its template — see
Record a new audio message or
Create a message via Text-to-Speech. The message
typically says "You are number <N> in the queue" where the number is filled in
automatically at playback time. Abilis provides a default message; customise it to
match your business voice (same voice as the rest of your IVR, same tone).
Test it. Call your office number from a mobile phone. While one colleague is already on a call (so all agents are busy), your call should enter the queue and you should hear the music on hold. When the colleague hangs up, your call should ring their phone automatically. If position announcement is enabled, you should also hear the position update at the configured interval (typically every 30–60 seconds).
Goal: When customers call your main number, they hear a menu that
routes them to the right agent or queue. "Press 1 for sales, 2 for support, 3 for
accounts." Inside each option there can be further choices — support might offer
"1 for existing orders, 2 for technical help." Calls end up in queues with music on
hold and announced position. This is the bread and butter of any small contact
centre.
Tools > DISA > Services > service detail. The Sub Service button at the bottom lets you create a nested menu — callers who press a key in this menu can be sent to another DISA service with its own options.
Plan the tree on paper first. Write each menu level, its choices and what each
choice does. A typical small-centre tree:
Level 1: "Press 1 for sales, 2 for support, 3 for accounts, 0 for operator"
Level 2 (support): "Press 1 for existing orders, 2 for technical, 0 to go
back"
Each terminal leaf is a queue or a specific phone/group.
Doing this before touching the configuration saves enormous rework.
Record all the prompts — see
Record a new audio message. Recording
them all at once in the same voice keeps the experience consistent. Aim for short,
clear prompts. Name them systematically:
ivr_main.wav, ivr_support.wav, etc.
Create each queue — see Configure a call queue with music
on hold. One queue per terminal leaf. Configure the agents (the people who
will pick up calls) and the music-on-hold track for each.
Build the top-level DISA — see Set up an auto-attendant.
This plays the main prompt and listens for a key press. For each key, the
destination is:
A queue directly (for simple first-level routing like "press 3 for accounts").
A second-level DISA (for nested menus — "press 2 for support, then
choose…").
For each nested level, create another DISA responder pointing at its own prompt,
with destinations for each key. These can in turn call a third DISA, but keep the
tree shallow — customers give up on menus deeper than two levels.
Wire the incoming number to the top-level DISA in
Phone > CTI Routings. Incoming calls now land on the
main menu.
No agents available in a queue: configurable within the queue
(overflow to another queue, to voicemail or back up to the main menu).
Caller presses no key: default timeout behaviour in the DISA
editor — usually "route to operator" or "play message and hang up."
Test every branch, including the back-to-previous-menu and the invalid-key paths.
Customers find combinations you didn't anticipate the first day it goes live.
Add identifying information to each queue, not generic "please
hold." A caller hearing "You have reached Support — Technical" is reassured
they made the right selection. Mis-routes are caught earlier.
Queue statistics (average wait, abandon rate, agent utilisation) are
visible in View phone traffic statistics. Use them to tune
the tree — if one queue is always empty and another is always overloaded, the menu
structure is directing callers poorly.
Record and upload a custom audio greeting
Goal: Record a custom greeting that callers will hear — for example, "Welcome to ABC Company" — using your browser's microphone or by uploading an audio file.
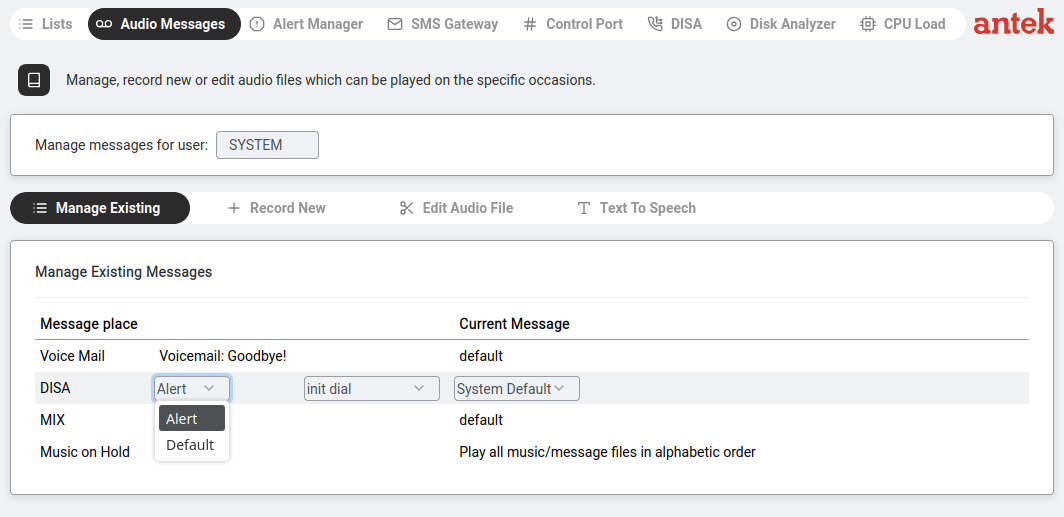
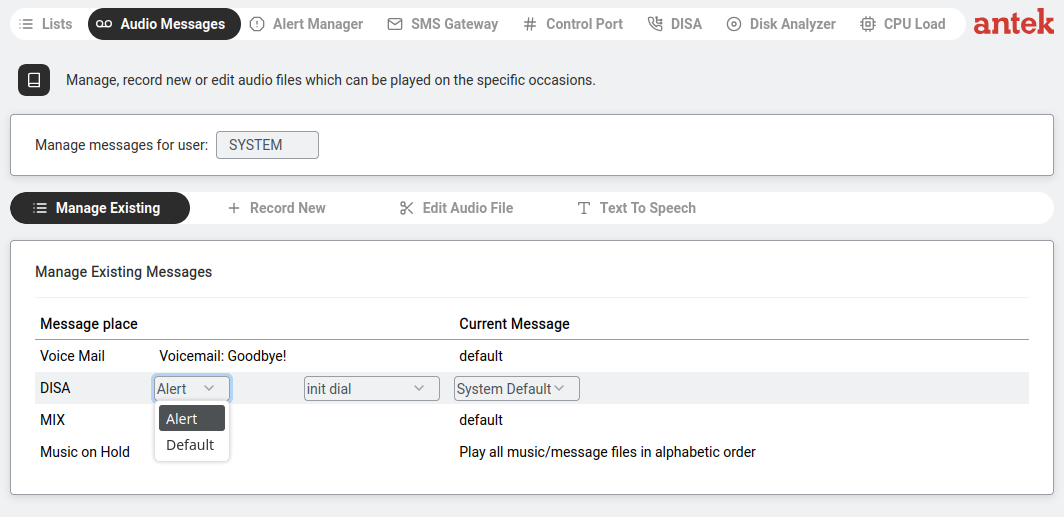
Audio Messages — Manage Existing shows all message places: Voice Mail, DISA, MIX, Music on Hold.
Go to Tools > Audio Messages.
At the top, select Manage messages for user: (SYSTEM for system-wide messages, or a specific user for personal voicemail).
The Manage Existing tab shows four message places:
Voice Mail — the voicemail greeting (e.g. "Voicemail: Goodbye!").
DISA — greeting for the auto-attendant. Select which DISA service (e.g. "Alert" or "Default")
and the message type (e.g. "init dial"). The dropdown lets you choose "System Default" or a custom file.
MIX — combined/mixed messages.
Music on Hold — what callers hear while waiting. Default: "Play all music/message files in alphabetic order."
To create a new recording, use the other tabs:
Record New — the Abilis calls your phone. You speak the message. It saves automatically.
Goal: Make multiple phones ring at the same time when someone calls a specific number — so that in a team, any available person can pick up the call. For example, you want extensions 201, 202 and 203 (the sales team) to all ring when someone calls the sales number.
How it works: You assign extensions to a group (e.g. G3), then create a CTI routing rule
that says "when a call arrives for group G3, ring all phones in G3." The first person to answer gets the call.
First, assign extensions to the group. Go to Administration → Users Management.
Open each user who should be in the group, go to their Phone settings and set their group to G3
— any identifier in the range G1–G32 works. (G0 is reserved
for system resources and read-only.)
Go to Phone → CTI Routings. Click New + to create a new routing rule.
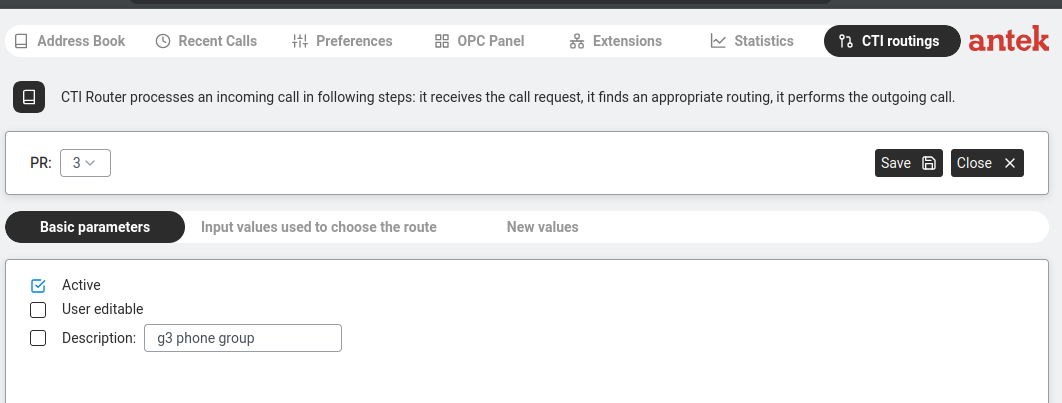
Basic parameters tab: tick Active and enter a description so you recognise it later (e.g. "Sales team ring group").
Basic parameters — tick Active and give the rule a meaningful description.
Input values tab: tick Input group and enter the group identifier (e.g. G3).
This tells the Abilis "this rule applies when a call is directed at group G3."
Leave Input port/group and Input cluster/group as # (meaning "any" — don't filter by these).
Input values — tick "Input group" and enter the group identifier. The # fields mean "any value" (no filter).
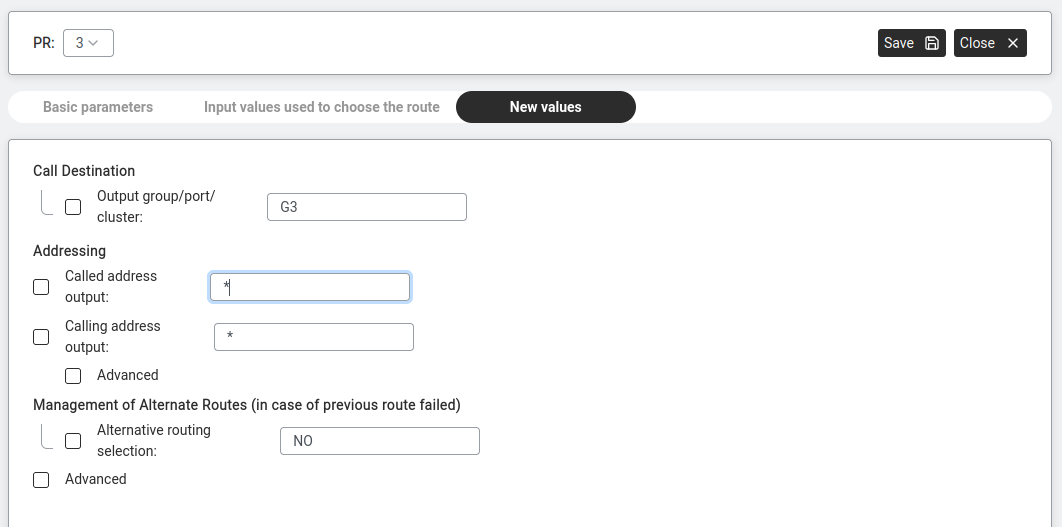
New values tab: set Output group/port/cluster to the same group identifier (G3).
Leave Called address output and Calling address output as * (meaning "pass through unchanged" — the original caller ID and dialled number are kept as-is).
New values — output to G3. The * fields mean "don't change the number" (pass through the original caller ID and dialled number).
Click Save.
Tip: To test it, call the number that routes to this group. All phones assigned to G3 should ring simultaneously. The first person to pick up gets the call — the others stop ringing.
Group membership is set per user — there's no batch tool to assign many users to a
group at once. For large groups, plan the assignments at user-creation time, or batch the
changes via the v9.0 reference manual's
CLI commands.
Use SIP phones or speakers for building-wide announcements (PA)
Goal: A member of staff picks up any desk phone, dials a short code
(e.g. *55), speaks, and their voice is broadcast simultaneously through
every speaker in the building — or through specific zones like "shop floor",
"warehouse", "offices". Used for shift calls, visitor paging, evacuation announcements
and end-of-day notices. No separate PA system needed.
Multicast paging — the technique where one phone
sends audio and many phones (or ceiling speakers) receive and play it at the same
time, using the network's multicast capability. The phones act as a one-way PA
system for the duration of the announcement.
Decide the zones. Simple installations have one zone ("all speakers"); larger ones
split by floor or function. Each zone has its own paging group.
Set up paging-capable endpoints. These can be:
SIP desk phones with built-in speakers (most modern business
phones support multicast paging — the relevant option is usually
Multicast Listening in the phone's own web UI).
SIP ceiling speakers — single-unit devices that mount on a
ceiling, connect by PoE and register like a SIP phone.
Analog speakers driven through a SIP-to-line-out adapter
(for retrofitting an existing PA amplifier).
Configure each endpoint to listen on the zone's multicast address and port. Pick any
address in the IPv4 administrative-multicast range 239.0.0.0/8
(e.g. 239.0.1.10:5000 for "all speakers") — these addresses are
reserved for local-network use. Use a different port number per zone (e.g.
5000 for "all", 5001 for "shop floor").
Multi-zone listening is configured per endpoint (in each SIP phone or
speaker's own web interface — the exact field labels vary by brand). The Abilis
only sends audio to one multicast address per rule; the endpoints decide which
addresses to listen on and which to prioritise — e.g. a shop-floor speaker can
listen on both "shop floor" and "all speakers", with "all" given higher priority so
a building-wide page interrupts a zone-specific one.
On the Abilis, create a short-code or extension that triggers the paging group.
Go to Phone > CTI Routings and add a rule matching the
dialled code (e.g. *55) with the destination being the paging zone's
multicast target.
Test. From a desk phone, dial the code. Speak. Confirm the voice comes through
every endpoint in the zone. If the voice is delayed, tinny or echoing, the
problem is usually in the endpoint's audio settings, not the network.
For evacuation, also chain the code to a
multi-action alarm — dialling the code
simultaneously triggers the page and unlocks the emergency exits, turns on
guidance lights or any other life-safety action wired into the Abilis. One dialled
code, complete response.
For life-safety evacuations, check local regulations — many
jurisdictions require a certified evacuation PA system audited to specific standards,
independent of the ordinary phone system. An Abilis-based PA is ideal for operational
announcements, but may not substitute for a regulated fire-alarm PA.
Program a group of telephone lines
Goal: You have multiple external phone lines (e.g. two SIP trunks from different providers)
and you want to control which line the Abilis uses for outgoing calls — for example, always use the
cheaper provider for international calls, or spread calls across lines so one provider doesn't get overloaded.
How it works: Telephone line groups are defined through CTI routing rules. You assign each external
line a group identifier (G1, G2, G3…), then create routing rules that direct calls to a specific group
based on the dialled number pattern.
Go to Phone → CTI Routings. Click the Phone icon in the sidebar, then select CTI Routings.
Identify your external lines. Look at Phone → Extensions first — your external lines
(SIP trunks) appear with an asterisk (*) followed by a port number as their Number. (See the
asterisk-meaning note in §1 for the two different uses of * in this table.)
Note their interface identifiers.
Create a routing rule. Back in CTI Routings, click New +.
Set the dialled number pattern. For example, to route all international calls (starting with 00) through a specific line group, enter 00* as the called number pattern. (The trailing * is a wildcard meaning "any digits after 00", so this matches anything dialled with the 00 prefix.)
Assign the line group. In the routing rule settings, specify which line group (G1–G32) should handle matching calls.
Save and test. Make a test call matching the pattern and verify it goes through the correct line.
Tip: If you just want all your phones to ring together when someone calls (a ring group), that's a different feature — see Create a group of phones that ring together above.
Line groups and user-ring groups share the same G0–G32
identifier space. Use distinct identifiers for different purposes — e.g.
G1–G5 for ring groups, G10–G15
for line groups — so they don't accidentally conflict.
Connect a door or gate intercom (DoorPhone)
Goal: A visitor presses the button at your gate or front door.
Specific phones inside ring; when someone answers, they speak to the visitor through
the intercom's microphone. If the visitor is authorised, the person answering
presses a button on their phone and the gate unlocks. Optionally, a camera at the
entrance shows the visitor's face while the call rings.
The full doorphone sequence: SIP call from intercom → Abilis PBX → reception phone → receptionist presses # → Abilis pulses the relay → gate opens.
Give the door station a clearly named extension — e.g.
gate_front or extension number 99. This is the number
that will be shown as the caller when someone presses the button.
Configure the door station itself so that pressing its button calls a group of
internal extensions. Most door stations store a "call this number when pressed"
field in their own web interface. Point it at an Abilis
call group (e.g. reception + kitchen + office)
so several phones ring together.
Set up the gate unlock. The relay that unlocks the gate is usually a digital
output on a WIO module (see
Discover and connect a WIO module).
Configure the door station (or an Abilis rule) so that when the person who answers
presses a specific key — typically * or a configured DTMF digit —
the relay pulses for a few seconds and the gate opens. Many SIP door stations
have a "DTMF unlock code" field for this.
Optionally pair with the entrance camera. When the door button is pressed, a
small automation rule can jog a PTZ camera to a preset — see
Jump a PTZ camera to a preset on an
event — so the person who answers sees the visitor on a monitor or on the
web interface.
Test. Press the door button. The configured group should ring. Answer on one of
the phones, check voice works both ways, press the unlock DTMF, verify the gate
opens.
For holiday homes or offices with no permanent staff, combine this with
after-hours routing so presses after-hours go to a mobile
phone instead of the empty office. The visitor still gets a human answer; the owner
unlocks the gate from anywhere with a DTMF digit on their mobile.
The quality of the voice channel depends on the door station. Pick one
with IP-rated weatherproofing (IP54 or better), built-in PoE and a documented
DTMF-unlock feature. Saving €100 on the hardware tends to cost far more in
support visits afterwards.
Check who called while you were away
Goal: You were away from your desk (in a meeting, on break, out of office) and you want to see
if anyone tried to call you, who they were and when they called — so you can call them back.
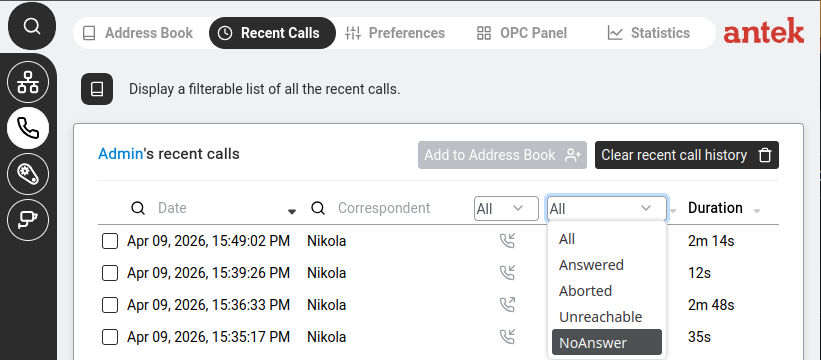
Recent Calls — the filter dropdown lets you show only unanswered calls (NoAnswer).
Go to Phone → Recent Calls. Click the Phone icon in the sidebar, then select Recent Calls.
Look at the call list. You'll see a table with columns: Date, Correspondent (the caller's name if known), a direction icon and Duration.
Filter to show only missed calls. Use the second filter dropdown at the top right of the table and select NoAnswer. The table now shows only calls that rang your phone but were not answered. Other useful filters: Answered, Aborted (caller hung up), Unreachable (your phone was offline).
Call them back. Note the name or number from the Correspondent column. You can also click Add to Address Book on the row to save the number for future reference (see Recent Calls page actions for all the row actions available).
Tip: If you see a number you don't recognise and want to save it, click Add to Address Book on the row (see Recent Calls page actions) — or go to Add a contact and enter it manually.
Goal: Use the Operator Panel to see all active calls in real time, transfer calls between extensions and manage incoming calls — a receptionist's switchboard in your browser.
OPC Panel — extension tiles with names and numbers. Dark tile = on a call.
Go to Phone > OPC Panel.
Each extension appears as a tile showing the name and extension number.
Tile colour indicates status:
Light/white — available, not on a call.
Dark/grey — currently on a call.
Two toggles at the top: Current Calls view and Queues view — enable these
to see active calls and queue status in the right sidebar.
Click Settings (gear icon) to customise which extensions are shown.
Click an extension tile to start a new call to that extension. To transfer an active call, drag it onto the target tile (the v9.0 manual calls this "click with the left mouse button on the OPC user box and keep it pressed while dragging it to the target user's box"). See OPC Panel reference for the full gesture.
View phone traffic statistics
Goal: See how many calls your office handles, how quickly they are answered, how many are missed and which extensions are busiest — useful for spotting peak hours, staffing problems or quality issues.
Go to Phone → Statistics.
Click New Preset to create a new report.
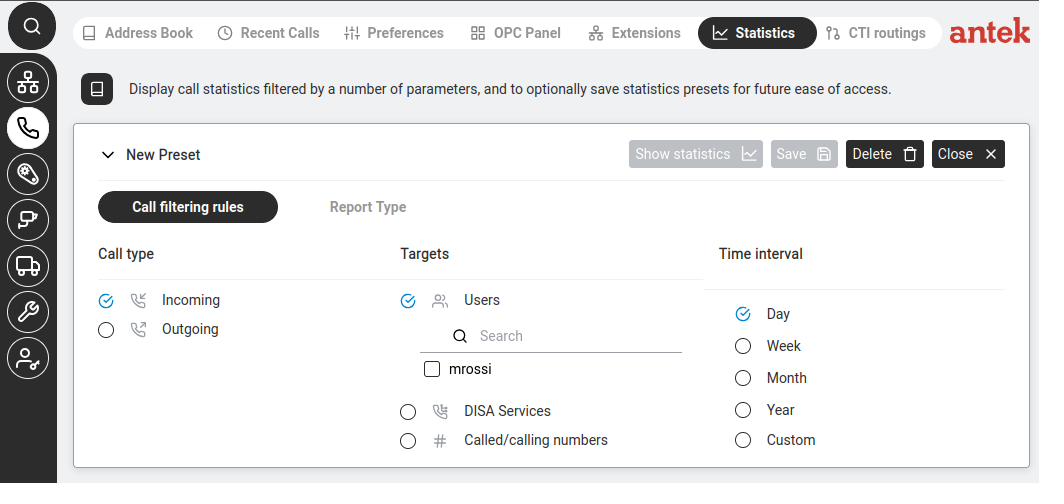
On the Call filtering rules tab, choose what to analyse:
Call filtering rules — choose Incoming or Outgoing, select which users to include and pick a time range.
Call type: Incoming, Outgoing or both.
Targets: select specific users from the list (with search), DISA Services or specific called/calling numbers.
Time interval: Day, Week, Month, Year or Custom date range.
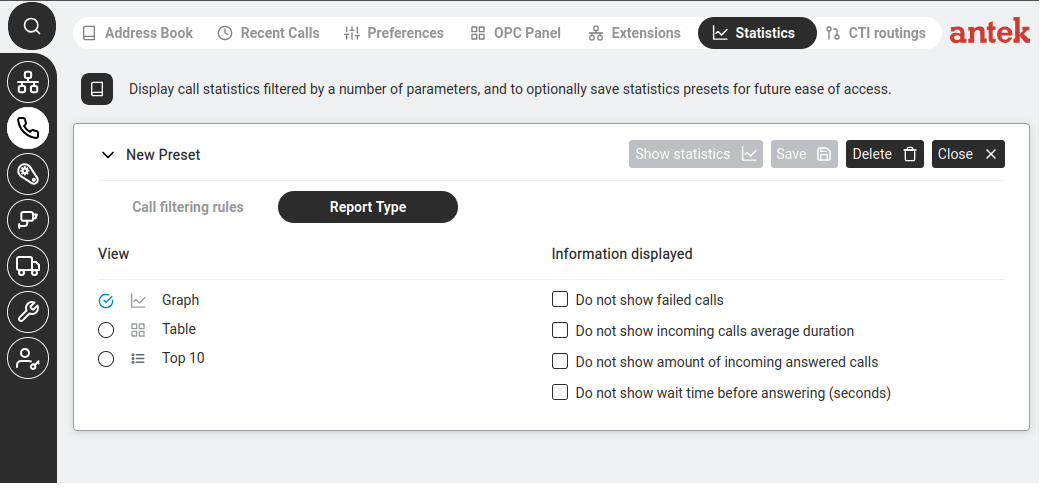
Switch to the Report Type tab to choose how the results are displayed:
Report Type — choose Graph (visual chart), Table (raw numbers) or Top 10 (busiest extensions). Untick metrics you don't need.
View: Graph (visual chart over time), Table (raw numbers) or Top 10 (busiest extensions).
Information displayed: untick any metrics you don't need — failed calls, average duration, answered calls count, wait time before answering.
Click Show statistics to generate the report.
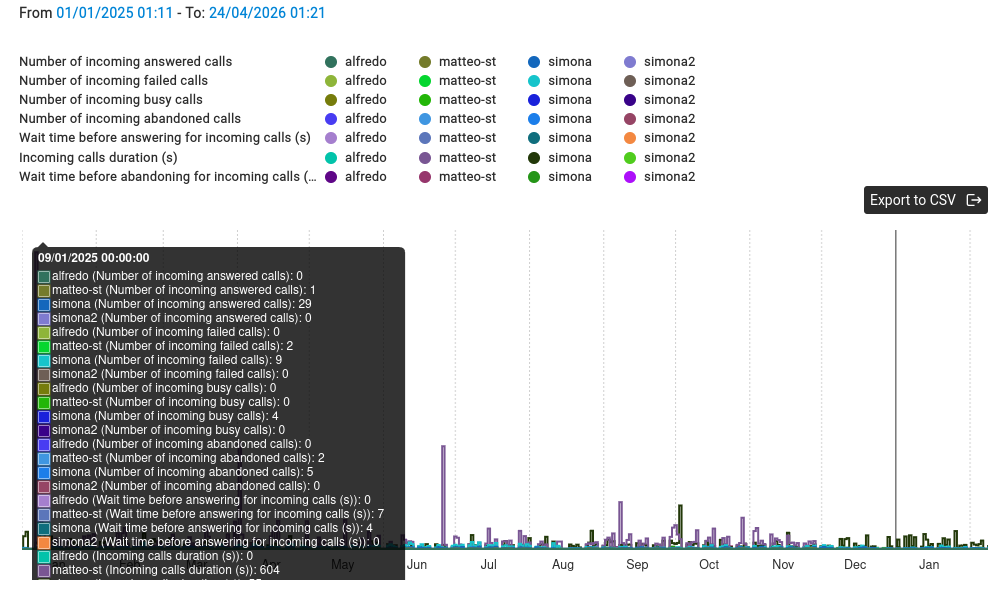
Statistics results — stacked bars per day across the selected range. Each user has a colour in each metric category (answered, failed, busy, abandoned, wait time, duration). Click any bar to see the exact counts per user for that day. Export to CSV saves the raw data.
The graph view shows a colour-coded legend (one colour per metric per user) and a time-based chart.
You can click Export to CSV to download the raw data for analysis in Excel.
Click Save to keep the preset so you can quickly re-run the same report later.
Send an SMS from the web interface
Goal: Send an SMS text message directly from the Abilis web interface to any mobile phone number — without needing your own mobile phone.
Uploaded Files — previously uploaded CSV files for bulk SMS.
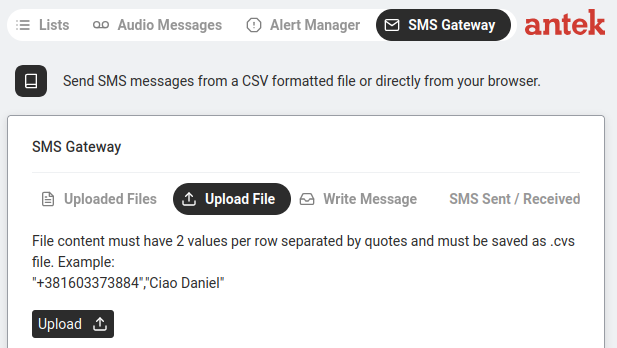
Upload File — upload a CSV with numbers and messages for batch sending.
Write Message — compose a single SMS.
SMS Sent / Received — history of all messages.
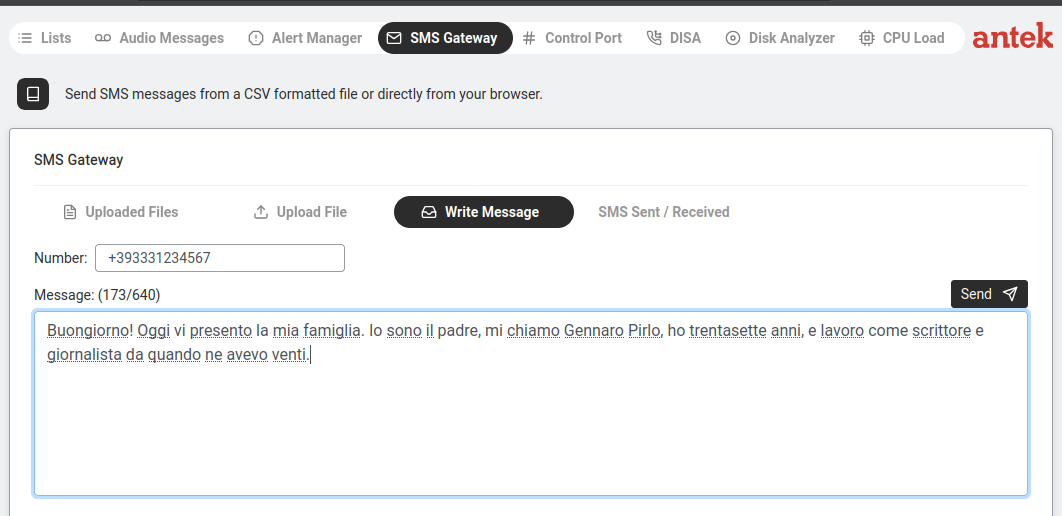
Click Write Message.
Write Message — enter number and text. Character counter shows 173/640.
Enter the Number (with country code, e.g. +393331234567).
Type your Message. The counter shows characters used / maximum. Standard SMS is 160 characters; messages longer than that are automatically split into up to 4 concatenated parts on the carrier side (4 × 160 = 640), which the recipient sees as a single message.
Click Send.
Billing. Each 160-character segment of a concatenated SMS is billed
separately by the carrier. A 200-character message = 2 billable SMS; a 600-character
message = 4. Check your SIM tariff before sending bulk long messages.
Requires an active SIM card with SMS capability in the UMTS-BOX or
LTE-BOX (CELLKEY) hardware connected to this Abilis.
Register Abilis as a client of a SIP provider (external VoIP)
Goal: You want the Abilis to make and receive calls to regular phone numbers (landlines, mobiles)
over the internet, using an external VoIP provider like Messagenet, OVH or Vodafone Business.
Once connected, all internal phones on the Abilis can dial external numbers through this provider.
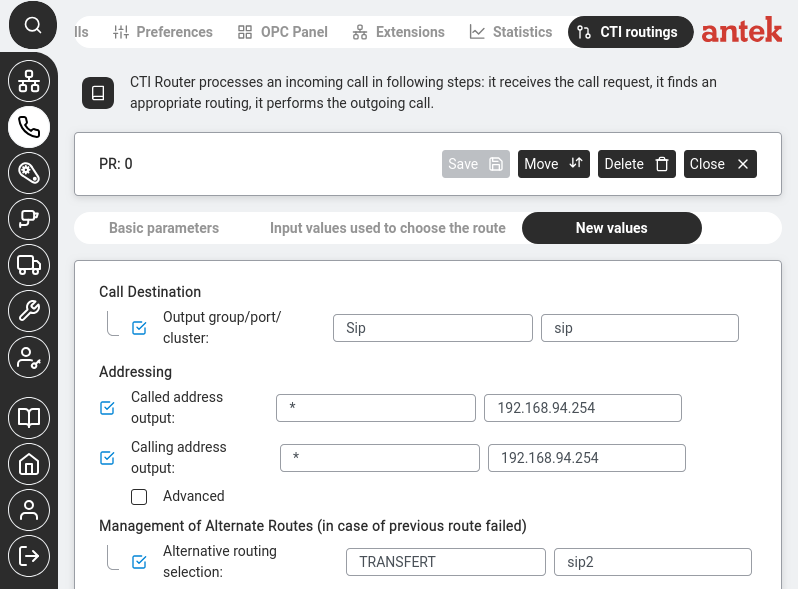
Phone > CTI routings > rule detail (New values tab). The Output group/port/cluster is set to Sip, routing outbound calls through the SIP trunk to the provider.
What you need from your VoIP provider: Before you start, ask your provider for a configuration sheet. You'll need their SIP registrar address (e.g. sip.provider.com), your account username, your account password and which audio codecs they support (G.711, G.729, etc.).
Go to Networking → Settings → Ports. This is where external connections are configured.
Find the SIP resource. Look for an existing SIP port entry, or create a new one if your system doesn't have one yet.
Enter your provider's settings. Fill in the registrar address, username and password from the configuration sheet your provider gave you. Set the codec preferences to match what the provider supports.
Apply Changes. The Abilis will attempt to register with the provider.
Verify registration. Go to Phone → Extensions. A successfully registered SIP trunk appears as an entry with an asterisk (*) as Number and a port number as Interface (e.g. 501).
Note:SIP trunk configuration depends heavily on your specific provider's requirements — some need STUN settings, some require specific port ranges, some use different authentication methods. If the registration fails, check that the registrar address, credentials and codec settings exactly match what your provider specified. If you're unsure, contact Anteklab support with your provider's configuration sheet and we'll help set it up.
Link two Abilis PBXs so extensions can call each other
Goal: Your company has two sites, each with its own Abilis. You want
people at site A to dial site B's extensions as if they were on the same phone system —
no external gateway, no long-distance billing, just internal four-digit calls that
travel over the VPN.
How it works: the Abilis carries voice between two sites by binding a
named cluster to an existing inter-site tunnel. The tunnel can be an AIPT2VPN
(carries data + voice) or a dedicated voice tunnel; the voice binding is what makes
extensions on both sides visible to each other's CTI routing.
On Abilis 1, go to Phone > CTI Routings
(or wherever the CTI Cluster table is exposed in your GUI). Add a new cluster:
Cluster name: a short identifier for the remote site,
e.g. Abilis2.
Number prefix: the dial prefix used to reach the remote site
(e.g. 05555667701 or a short internal prefix like 2).
Description: clear, e.g. to_Abilis_2.
Bind the cluster to the inter-site tunnel: add a CTI Link entry pointing at the IP
resource used by the tunnel (e.g. Ip-7 for an AIPT2VPN, or a dedicated
voice tunnel resource).
Click Save.
On Abilis 2, repeat with mirror-image values — the cluster name is
something like Abilis1, the number prefix is the one used to reach site
1 and the CTI Link points at the same tunnel resource.
Save on the second side as well.
Test — from a phone on site A, dial an extension at site B. The call should go
through the tunnel with internal call quality. If the two sites share extension
ranges, you may need a dial-prefix strip rule in CTI Routings.
Extensions that cross a tunnel show up in Phone >
Recent Calls just like internal calls — there is no special marking for "came from
the other site". If you want to see which calls used the tunnel, filter by the cluster
name in Phone > Statistics.
Advanced: CLI equivalent
The CLI command sequence for this task is documented in
Chapter 85.7 — How to create a VoIP tunnel of the old Abilis manual.
A rewritten CLI guide is in preparation; this link will be updated when it is ready.
Enable call pickup between colleagues
Goal: A colleague's phone is ringing on their desk, but they're not there. You want to answer
their call from your own phone without walking over — by dialling a short code.
How it works: The Abilis supports two pickup methods:
Method
What you dial
When to use it
Directed pickup
*8 + the ringing extension number (e.g. *8201 to pick up extension 201)
You can see or hear which specific phone is ringing and you want to answer that one.
Group pickup
**8
Any phone in your pickup group is ringing — you don't need to know which one. The Abilis connects you to the longest-waiting call.
Try it. When you hear a colleague's phone ringing, pick up your own phone and dial *8 followed by their extension number. You should be connected to their caller.
If it doesn't work: The pickup codes may be different on your system, or the feature may not be enabled. Go to Phone → CTI Routings and look for routing rules containing *8 — this shows the configured pickup codes.
If no pickup rules exist: they need to be added in Phone → CTI Routings. Click New + and add a rule that maps the dial pattern (*8 + extension) to the pickup action. If you do not have access to CTI Routings, this is a unit-wide configuration change that an Anteklab technician can make for you.
Transfer a call with consultation (attended transfer)
Goal: You are on a call that should go to a colleague. You want to
talk to the colleague first — "I've got Mr Rossi about the invoice, can you
take it?" — and only then put the original caller through. If the colleague can't
take it, you want to go back to the original caller and do something else.
Attended transfer (also called consultative
transfer) — a two-step transfer: first you put the caller on hold and dial the third
party, speak to them, then connect. The opposite is blind transfer where the
caller is sent directly to the third party without warning.
While on the call, tell the caller you are transferring them and ask them to hold.
Press the transfer button on your phone (or use the softkey labelled
Transfer, Xfer or with a transfer icon). The original caller is
put on hold.
Dial the colleague's extension. Wait for them to answer.
Speak to them — introduce the caller and confirm they will take the call.
Complete the transfer:
Colleague will take it — press transfer again
(or the complete softkey). The two parties are connected and you drop
out.
Colleague can't take it — hang up the consultation call. On
most phones you are then returned to the original caller, who was on hold the
whole time.
The exact button labels depend on the phone. On most SIP desk phones
the sequence is: Transfer → dial extension → wait → Transfer. On the
web softphone and on some older phones the second press is labelled Connect or
Complete. Check your phone's manual if the keys don't match — the flow is the
same, just the labels differ.
For simple transfers where you don't need to speak to the recipient
first, use blind transfer: press transfer, dial the extension,
hang up immediately. Faster when you know the recipient will take the call.
Set up a conference call
Goal: Set up a phone conference where multiple people can join the same call by dialling a number and entering a PIN — hosted entirely on the Abilis, no external service needed. The Abilis supports
two conference modes:
Mode
How it works
Simplified Conference
One person (the "owner") creates the conference by merging active calls.
When the owner hangs up, the conference ends. No dial-in number needed.
Basic Conference
Participants dial a conference number and enter a 4-digit room code.
The first person to enter a code creates the room; others join by entering the same code.
Conference requires the CTIMIX resource to be active on the system.
If the steps below have no effect, CTIMIX may not yet be enabled — this is a one-time
system activation that cannot be done through the web interface.
Simplified Conference — from an analogue phone (POTS)
Call the first participant as normal.
Press FLASH (R) to put the call on hold.
Dial the second participant.
Once the second person answers, press FLASH (R) then 5 to merge both calls into a conference.
To add more people: press FLASH (R), dial the next person and when they answer press FLASH (R) + 5 again.
Simplified Conference — from PCphone or AbilisPhone
Make your first call.
Make a second call (the first is automatically parked).
With both calls active/parked, the conference button becomes enabled — click it to merge.
Repeat for additional participants.
SIP and IAX phones do not currently support Simplified Conference.
Use an analogue phone (POTS), PCphone or AbilisPhone instead.
Basic Conference — dial-in with room code
Dial the conference number (e.g. 0555555555 — your system may use a different number). To find your dial-in number, check Phone → CTI Routings for a rule whose Exit port is Mix. The Called number pattern on that rule is your dial-in. If no such rule exists, an administrator needs to create one.
You hear a prompt asking for a conference room code.
Enter a 4-digit code (e.g. 1234). If no conference exists with that code, a new room is created.
Other participants dial the same conference number and enter the same code to join.
The maximum conference duration is 60 minutes by default (configurable 15–300 min).
By default the CTIMIX resource supports 3 simultaneous participants per session; an administrator can raise this up to 255.
Enable on-demand call recording
Goal: During a phone call, you want to start recording the conversation — for example,
to keep a record of an agreement, a customer complaint or instructions you need to remember later.
You press a key on your phone, the recording starts and the audio file is saved on the Abilis.
Two recording features coexist on the Abilis:
(1) Automatic recording of every call for users who tick Voice Recorder
in Phone → Preferences — covered there.
(2) On-demand recording via a DTMF code during a specific call —
covered here. They can be used together (auto-record everyone, plus give individual users
a manual start/stop key for special situations).
Check that the Voice Recorder option is visible for your user. Go to Phone → Preferences. If a Voice Recorder or Call Recording section is shown, on-demand recording is available on your account and you can skip to the next step. If the section is not shown, the required licences are not installed: CTIVR for the recorder itself, the SoftPBX licence (with OPC) to enable the operator-panel record control and the SMTP licence if recordings need to be delivered by email. Contact Anteklab to confirm and, if needed, add the missing licences.
During a call, press *# on your phone keypad. The Abilis begins recording both sides of the conversation. You may hear a short beep or tone confirming recording has started (depending on your phone model).
Press *# again to stop recording. Or simply hang up — the recording stops automatically when the call ends.
Find your recording. Go to Phone → Recent Calls. The call you recorded will have a playback icon or download link next to it. Click it to listen or save the file.
Note: The default recording key is *# (configurable via the
OD-CODE parameter to any single or two-character sequence in
[DISABLED, 0–9, A–D, *, #]). If pressing *# during a call
has no effect, the code may have been changed on your system — check
Phone → CTI Routings for the rule that triggers recording.
Also be aware that in many countries, recording a call without informing the other party is
illegal. Check your local regulations before using this feature.
Advanced: CLI equivalent
The CLI command sequence for this task is documented in
Chapter 85.23 — On-demand call recording of the old Abilis manual.
A rewritten CLI guide is in preparation; this link will be updated when it is ready.
Automatically record specific call types for compliance
Goal: Some calls must always be recorded regardless of who answers —
calls to / from specific numbers (financial advisors, legal hotlines), calls on
specific extensions (a complaints line) or every incoming call from outside on a
particular number. The difference from
on-demand recording is that this is automatic — nobody has
to remember to press Record; and nobody can forget or deliberately skip it.
Confirm that on-demand recording is working — see
Enable on-demand call recording. Automatic recording uses
the same storage, file naming and playback infrastructure; if on-demand isn't
working, auto recording won't either.
Add a rule to the CTIVR table (this is the dedicated automatic-recording
rule table, separate from CTI Routings). Each rule matches calls by criteria
like incoming/outgoing direction, called number (CDI), calling number (CGI) or source
port; matching calls are recorded automatically. Common patterns:
By called number: e.g. every inbound call to
0476123456 (the complaints line) is recorded.
By calling number: e.g. every call from a specific
customer whose contract requires it.
By extension: every call to or from extension 205 (the
financial-advisor desk).
Set retention. Recordings pile up fast on a busy line. Either use the built-in
retention window (delete after N days) or plan a regular export to
long-term storage — see
Export logs and call data.
Inform users. In most jurisdictions, automatically recorded calls require a
notification at the start — "this call may be recorded for quality and compliance
purposes." Use an audio prompt (recorded as per
Record a new audio message) played
by the DISA before connecting the caller to the agent. Some rules also require a
periodic tone during the call — configurable in the recording settings.
Test. Call the matching number. Confirm the call appears in
Phone > Recent Calls with a recording icon. Play it
back.
Legal requirements around call recording vary drastically by
jurisdiction — two-party consent vs one-party consent, retention obligations,
right-to-erasure, encryption at rest. Before enabling automatic recording on any line
that reaches external callers, verify what the law in your region requires. A
misconfigured system can create legal liability rather than reduce it.
For financial services and legal contexts, pair automatic recording
with centralised logging so the existence
of the recording is independently logged — useful when an audit needs to prove a
specific call was recorded, not just that some recordings exist.
Advanced: CLI equivalent
The CLI command sequence for this task is documented in
Chapter 85.23 — On-demand call recording of the old Abilis manual.
A rewritten CLI guide is in preparation; this link will be updated when it is ready.
Automate outbound calls to a list (polling, notifications, surveys)
Goal: You want the Abilis to dial a list of telephone numbers, one after
another, and play a pre-recorded message or prompt to each one. Not an emergency alarm
(that is Alarm via phone call) but a routine outbound
activity — end-of-day inventory confirmations from a list of suppliers, weekly
customer-satisfaction calls, event reminders to a group of clients, scheduled
check-ins.
This uses the same outbound-call engine as the alarm system, but driven by a timer or
a manual trigger rather than by an event. The recipient hears a pre-recorded message;
optionally they can press keys and the Abilis records which key they pressed.
Create the list of numbers to dial. Use
Create a list with the numbers in
international format (e.g. +39348...). Give the list a name like
weekly_customers.
Go to Phone > CTI Alarms. The name suggests alarms only,
but this page configures any scheduled or manual outbound-call campaign — alarms
are just one use case.
Click New + and configure:
Trigger:Scheduled (daily/weekly at a specific time)
or Manual (you press a button on the web interface to start it).
Numbers to call: the list you created.
Action:Play audio message, pointing at the recording
you made.
Behaviour on answer / voicemail: you can skip voicemails
(wait for a human voice) or deliver the message to voicemail too.
Retries: how many times to redial a number that doesn't
answer, and the delay between retries.
If you want to collect responses, enable DTMF collection. The recipient can press
1 for yes, 2 for no and the Abilis logs the key pressed against each
number.
Save. If the trigger is Scheduled, the campaign starts automatically at
the configured time. If Manual, click Start when ready.
Monitor progress in Phone > Recent Calls — each call
attempt appears with its status (answered / no answer / busy / voicemail) and,
where applicable, the DTMF digit the recipient pressed.
Outbound campaigns are limited by the number of simultaneous outgoing
lines your Abilis has (ISDN channels, SIP trunk concurrent calls). Large lists are
dispatched serially or in small parallel batches, not all at once. A list of 200 numbers
on a 2-channel line takes roughly 10–15 minutes to process.
Local regulations on unsolicited automated calls vary — some
jurisdictions require opt-in consent, time-of-day limits or an easy opt-out mechanism.
Make sure your use case complies before launching a campaign to external numbers.
Advanced: CLI equivalent
The CLI command sequence for this task is documented in
Chapter 85.24 — Sending an alarm through a call of the old Abilis manual.
A rewritten CLI guide is in preparation; this link will be updated when it is ready.
Set up alarm notifications via SMS or phone call
Goal: When something important happens — a sensor triggers, an internet connection goes down,
someone tries to break into the system — you want to receive an immediate notification on your phone,
even if you're not in front of the computer. The Abilis can send you an SMS, make a phone call
with a recorded message or send an email.
How it works: The Abilis uses Alert Channels (configured in Tools → Alert Manager)
to define how you get notified. Then, individual features (IP Ban, ARP Monitor, Control Loops, etc.)
reference these channels to define when you get notified.
Go to Tools → Alert Manager. Click the Tools icon, then Alert Manager. You'll see a list of alert channels (CH: 1, CH: 2, etc.).
Click on a channel (or create a new one) to configure it.
Tick the notification methods you want:
The available actions are:
Checkbox
What it does
E-mail
Sends an email to a configured address.
Sms
Sends an SMS to a configured phone number.
Telephone call
The Abilis calls a phone number and plays a recorded audio message.
Automation device
Triggers a physical output (e.g. turns on a siren or warning light).
Give the channel a description (e.g. "SMS to manager" or "Call security guard") so you can identify it later.
Click Save.
Now connect this channel to an event. Go to the feature you want alerts for:
For example, to get an SMS when someone is banned by IP Ban: go to IP Ban settings and select this alert channel.
For sensor-based alerts: configure it in your Control Loop.
For new-device alerts: set it in ARP Alert.
Important — Email and SMS have separate prerequisites:
Email needs a configured SMTP server (the outgoing-mail relay)
— currently a one-time CLI setup that your administrator handles. Verify:
send a test alert and check the recipient's inbox (and spam folder).
SMS needs an active SIM in the UMTS-BOX or LTE-BOX hardware. Verify:
check Tools → SMS Gateway → SMS Sent for delivery status.
Advanced: CLI equivalent
The CLI command sequence for this task is documented in
Chapter 85.25 — Sending an alarm through SMS of the old Abilis manual.
A rewritten CLI guide is in preparation; this link will be updated when it is ready.
Make a phone call when a sensor triggers (alarm call)
Goal: Your real-world customers: a cold-storage warehouse wants to be
called when the freezer temperature climbs; a factory wants someone rung when the
main gate opens after hours; an evacuation plan has the Abilis call every
employee's mobile with a pre-recorded fire message. When a sensor crosses a threshold
or a digital input goes high, the Abilis dials a phone number and plays a message —
automatically, without anyone sitting at a computer.
ALARM resource — the part of the Abilis that watches
inputs and triggers actions. CTIDISA — the auto-attendant engine that
plays a recorded message and, in "call-back" mode, dials an outside number and plays the
message to whoever answers.
The sensor wired to the Abilis: a digital input on a RIO (wired automation module, RS-485),
RVS (wired module focused on video/sensor integration) or WIO (wireless automation gateway over
a low-power radio link) device — see Discover and connect a WIO module
for the wireless case; the wired modules use the same Automation panel.
The phone number you want the Abilis to call.
Go to Tools > DISA.
On the Services tab, click Add + and create a
callback service:
Name: e.g. alarm_call.
Enable Call Back: yes.
Initial message: the audio you recorded (or composed via
Text-to-Speech).
On the Users tab, add a DISA user (e.g. alarm_user)
with Call Back enabled. The PIN field is required on the user record but is not
requested during outgoing callback calls (it's used only for incoming DISA pre-identification).
For a callback-only user, either set a placeholder value (e.g. 0000) or
set PIN to #, which per the v9.0 manual means "the user is identified by
calling number, no PIN needed".
Go to Tools > Alert Manager (or the Alarm table, depending
on firmware). Add a new alarm:
Trigger: select the sensor — e.g. RIO (or
RVS, WIO), then the digital input number
(e.g. DI-2), then the condition (on or above threshold).
Calling number (CGO): a number that will show as the caller —
pick one the recipient will recognise.
Click Save.
Test — trigger the sensor (close a door, open a valve, drop a temperature into the
alarm range). Within a few seconds your phone should ring and the recorded message
should play when you answer.
To call multiple people when one alarm fires — for example a fire
evacuation that rings 60 mobiles — configure a phone list instead of a
single number: the Abilis will dial every entry in the list, playing the same message. See
Create a list. This pattern is deployed in
production with lists of dozens of recipients.
Advanced: CLI equivalent
The CLI command sequence for this task is documented in
Chapter 85.24 — Sending an alarm through a call of the old Abilis manual.
A rewritten CLI guide is in preparation; this link will be updated when it is ready.
Deliver voicemail as an email attachment
Goal: When someone leaves a voicemail on your extension, the Abilis
sends you an email with the recording attached (as a WAV or MP3). You can listen on
your laptop, your phone or archive it — without ever logging in to the Abilis web
interface to check the mailbox.
When nobody answers, the call lands on voicemail. The recording is saved and forwarded as a .wav attachment via the SMTP sender.
Click the user whose voicemail should forward to email.
On the user's settings, find the Voicemail or
Voice mail section.
Configure:
E-mail address: where the recordings should be sent.
Attach recording: tick so the audio file is attached (not just
a notification that a message exists).
Delete after sending (optional) — removes the recording from
the Abilis after it has been emailed, saving disk space. Leave unticked if you
want the web-interface mailbox to also keep a copy.
Click Save.
Test — call the user's extension, let it go to voicemail, leave a short message.
Within a minute, the email should arrive with the message as a playable attachment.
Check the spam folder on the first test; some mail providers flag unknown senders.
For a shared mailbox (reception, sales) configure voicemail-to-email on
the shared user and set the E-mail address to a distribution list. Every
member of the list gets every message — nobody misses a voicemail because they're out
that day.
Set a temporary holiday or closure voicemail greeting
Goal: When your office is closed for holidays, weekends or any temporary period,
you want callers to hear a message like "Our office is closed for the holidays. We will be back on January 7th."
instead of the normal greeting. When you return, you switch back to the normal message.
Go to Tools → Audio Messages. In the sidebar, click the Tools icon, then select Audio Messages.
Find the DISA row. Under Manage Existing Messages, you will see a table with rows for Voice Mail, DISA, MIX and Music on Hold.
The DISA row controls what callers hear when they call your main number.
Change the DISA message. In the DISA row, use the dropdown menus to select your holiday greeting instead of the default message. If you recorded a message called "holiday-closed", select it here.
Apply. Click Apply to save. From this moment, all incoming calls will hear your holiday greeting.
When the holiday is over: Come back to this same page and change the DISA message back to the original greeting. Click Apply again.
Tip: Prepare your holiday greeting a few days before the closure so you only need to switch the dropdown on the last working day. You can have multiple greetings ready (summer holidays, Christmas, training day, public holiday) and swap between them.
Block incoming calls from a specific phone number
Goal: You are receiving unwanted calls from a specific number (spam, nuisance callers)
and you want the Abilis to reject those calls automatically, so your phones never ring for them.
First, create a list of blocked numbers. Go to Tools → Lists. Click New + to create a new list.
Give it a clear name like blocked-callers. Add the phone numbers you want to block — one per line, as digits only (same format as the Address Book Number field; e.g. 393351234567 for an Italian number — the leading 00 or + is the dialling escape, not part of the stored number).
See Create a list for the detailed steps.
Then, create a CTI routing rule. Go to Phone → CTI Routings. Click New + to add a new routing rule.
Set the condition: In the Calling Number field, reference your blocked list by typing its name in single quotes (e.g. 'blocked-callers') — same syntax as ACL list references. This means: "if the caller's number is in this list..."
Set the action: In the Action dropdown, select Reject or Busy. This tells Abilis to refuse the call.
Save. Click Apply. From now on, any call from a number in your blocked-callers list will be automatically rejected.
To add more numbers later: Simply go back to Tools → Lists, open your blocked-callers list and add the new number. No need to change the routing rule — it reads from the list automatically.
Tip: You can check which numbers have been calling you by looking at Phone → Recent Calls. Copy the number directly from there into your blocked list to avoid typos.
Change the extension number assigned to an internal phone
Goal: A colleague's desk phone is currently assigned extension 301, but you want to change it to 450
(for example, after an office reorganization or when a new employee takes over a desk).
Phone > Extensions. Each row maps an extension number to a username and a physical or virtual interface.
Go to Administration → Users Management. Click the Administration icon in the sidebar, then select Users Management.
Find the user. In the users list, click on the user whose extension you want to change.
Open Basic Parameters. In the user's settings, look for the Basic Parameters tab.
Find the extension number field. Look for the field labelled Extension or Interno. It will show the current number (e.g. 301).
Type the new number. Replace the old extension with the new one (e.g. 450). Make sure no other user already has this number — the Abilis does not warn you on Save if the number is already taken, so you must cross-check the full users list manually before saving. Otherwise the change will silently fail (or, worse, hijack someone else's extension).
Save. Click Apply Changes. The phone will need to re-register (this usually happens automatically within a few seconds). The user's phone will now ring when someone dials the new extension number.
Note: For physical SIP desk phones (not softphones), the phone itself will most likely need its account number/username updated in its own settings menu to match the new extension — until you do this, the phone will not register and incoming calls won't reach it. Softphones that auto-fetch credentials usually update themselves.
Anteklab Technical Support
Email: tem@antek.it
Tel: +39 0376 16262,27